Turning Your Wishes into Sweet Realities, One Homemade Treat at a Time. 🌟

Friday, 29 March 2024

Eid Essence Ginger Tea Biscuits AKA (Biscuit Al-Nashader)

Welcome back to Sam's Baking Blog! As we approach the end of the holy month of Ramadan, it's time to prepare for the joyous celebration of Eid. Today, we're making Ginger-Flavored Tea Biscuits, also known as Biscuit Al-Nashader. These crisp, delicately spiced biscuits are a traditional favorite in many Muslim countries during Eid celebrations. Perfect for sharing with family and friends, these biscuits are a delightful way to mark the conclusion of Ramadan and the beginning of festive Eid gatherings.

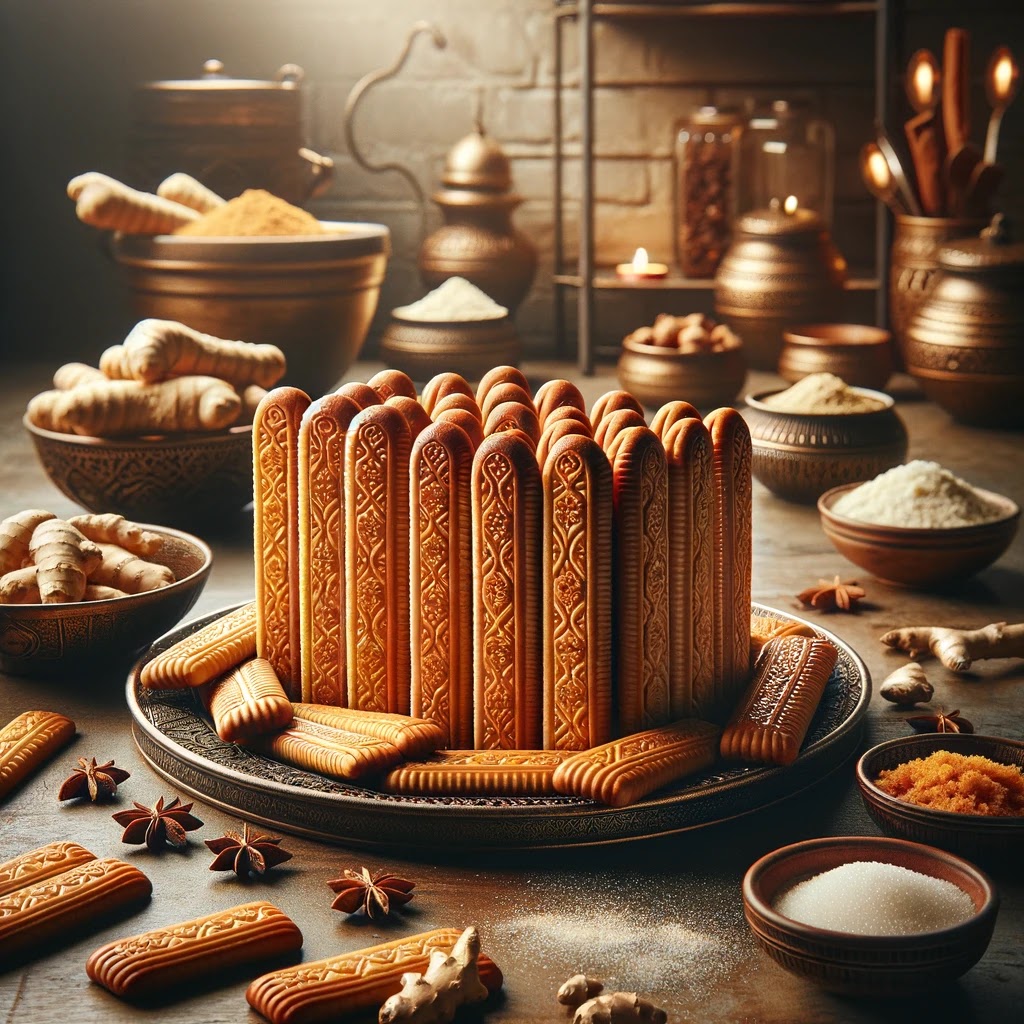
Origin Story: Ginger Tea Biscuits 

Ginger Tea Biscuits, also known as Biscuit Al-Nashader, are a traditional treat in Sudan and other parts of the Middle East, especially popular during Eid celebrations. These biscuits are characterized by their light, crunchy texture, achieved using baker's ammonia (nashader) as a leavening agent.

Historical Roots

The use of baker's ammonia in baking dates back centuries and was common in many traditional recipes before the advent of modern baking powder. This ingredient, known for creating a very light and crisp texture, is particularly suitable for biscuits like Biscuit Al-Nashader. The origins of these biscuits are rooted in Middle Eastern and North African culinary traditions, where spices and unique leavening agents were often used to create distinctive baked goods.

Cultural Significance

In Sudan and other Middle Eastern countries, Biscuit Al-Nashader is a staple during festive occasions, particularly Eid al-Fitr and Eid al-Adha. These biscuits are often prepared in large batches and shared with family and friends, symbolizing hospitality and celebration. The preparation and sharing of these biscuits are a beloved tradition, bringing families together in the kitchen.

Recipe Insights

Biscuit Al-Nashader typically includes simple ingredients such as flour, sugar, eggs, and butter, with ginger as the primary flavoring. The unique aspect of these biscuits is the use of baker's ammonia, which contributes to their signature texture. The dough is often rolled out, cut into shapes, and then baked until golden and crisp.

Adding ginger to these biscuits not only enhances their flavor but also provides a warming, aromatic quality that pairs perfectly with tea. Some variations of the recipe include additional flavorings like orange zest or vanilla, adding a unique twist to the traditional biscuits.

Personal Connection

My journey with Ginger Tea Biscuits began during an Eid celebration with friends from Sudan. The delightful aroma of ginger and the light, crispy texture of the biscuits made a lasting impression. Inspired by this experience, I set out to recreate the biscuits in my own kitchen. The key to perfecting the recipe was balancing the ginger flavor and achieving the right texture with baker's ammonia.

Sharing the Tradition

Today, Ginger Tea Biscuits are a favorite in my home, especially during festive occasions. They are the biscuits I bake when I want to share a taste of Middle Eastern tradition with my family and friends. Each batch is a celebration of cultural heritage and the joy of baking.

Ingredients:

2 cups all-purpose flour
1/2 cup granulated sugar
1/2 cup vegetable oil
1/4 cup unsalted butter, softened
1/4 cup milk
1 tablespoon baking powder
1 teaspoon ground ginger
1/2 teaspoon ammonium bicarbonate (nashader)
Pinch of salt

Prep Time: 15 minutes
Cook Time: 10-12 minutes
Yield: 24-30 biscuits

Instructions:

  1. Preheat the oven to 350°F (175°C). Line a baking sheet with parchment paper.
  2. In a large bowl, cream together the butter, oil, and sugar until light and fluffy.
  3. In a separate bowl, sift together the flour, baking powder, ground ginger, ammonium bicarbonate, and salt.
  4. Gradually add the dry ingredients to the wet ingredients, alternating with the milk, until a soft dough forms.
  5. Roll out the dough on a lightly floured surface to about 1/4 inch thickness. Use a cookie cutter to cut out the biscuits and place them on the prepared baking sheet.
  6. Bake for 10-12 minutes, or until the edges are lightly golden. Allow the biscuits to cool on the baking sheet for a few minutes before transferring them to a wire rack to cool completely.

Pro Tips:

  • Ensure the ammonium bicarbonate is finely ground for even distribution in the dough.
  • Do not overbake the biscuits to maintain their crisp texture.

Secret Tips:

For a more pronounced ginger flavor, add a tablespoon of finely grated fresh ginger to the dough.

Serving Options:

Serve these biscuits with a cup of mint tea or Arabic coffee for an authentic Middle Eastern experience.

Health Benefits:

Ginger is known for its anti-inflammatory properties and can aid in digestion.

Variations & Customization Options:

  • Add a pinch of ground cardamom or cinnamon to the dough for a different flavor profile.
  • Dip the cooled biscuits in melted chocolate for a sweet twist.

These Ginger-Flavored Tea Biscuits are a delightful addition to any tea or coffee break. Their crispy texture and subtle spice make them a perfect treat for any occasion. 

Enjoy baking and sharing these traditional biscuits!
Eid Mubarak!
Sam

Twilight Swirl Marble Muffins

Welcome back to Sam's Baking Blog! Today, we're taking a classic favorite and turning it into a portable treat with these Marble Muffins. Combining the best of both vanilla and chocolate, these muffins are perfect for those who can't decide between the two!

Origin Story: Marble Muffins

Marble muffins are a delightful combination of chocolate and vanilla batter swirled together to create a visually appealing and delicious treat. These muffins, known for their beautiful marbled pattern, are a favorite for breakfast, brunch, or as a sweet snack.

Historical Roots

The concept of marble cakes dates back to the 19th century in Germany, where the tradition of "Marmor Kuchen" (Marble Cake) began. German immigrants brought this technique to America, where it evolved into various forms, including muffins. The marble pattern is achieved by gently mixing two different batters, typically chocolate and vanilla, to create a visually appealing swirl.

The popularity of marble cakes and muffins grew in the United States during the 19th and 20th centuries. The recipe was often found in American cookbooks, celebrated for its striking appearance and delightful combination of flavors. The versatility and simple preparation of marble muffins made them a household favorite.

Cultural Significance

Marble muffins hold a special place in American baking culture, symbolizing creativity and the joy of baking. The striking visual appeal of the marbled pattern makes these muffins a popular choice for special occasions, brunches, and bake sales. They are loved by both children and adults, providing a perfect balance of chocolate and vanilla in each bite.

Personal Connection

My connection to marble muffins began during my childhood, when my mother would bake them for weekend breakfasts. The process of creating the marble effect always fascinated me, and I loved helping her swirl the batters together. The anticipation of seeing the beautiful patterns emerge as the muffins baked was always exciting.

Inspired by these memories, I set out to perfect my own marble muffin recipe. The key was to create a rich and moist batter that would hold its shape and flavor during baking. After experimenting with various recipes, I found that using high-quality cocoa powder and vanilla extract made a significant difference in the taste and appearance of the muffins.

Recipe Evolution

Creating the perfect marble muffins involves a few key steps. The batters for the chocolate and vanilla layers should be mixed separately to ensure distinct flavors. The chocolate batter is typically enhanced with cocoa powder and sometimes melted chocolate, while the vanilla batter is flavored with vanilla extract.

To create the marble effect, spoonfuls of each batter are alternately placed in the muffin cups. A toothpick or skewer is then used to gently swirl the batters together, creating the signature marbled pattern. Care must be taken not to overmix, as this can cause the batters to blend too much and lose the distinct marbling.

Baking the muffins at the right temperature ensures they rise evenly and develop a golden crust. The result is a muffin that is both visually stunning and delicious, with a perfect balance of chocolate and vanilla flavors.

Sharing the Tradition

Today, marble muffins are a favorite in my household. They are the muffins I bake when I want to share a touch of nostalgia and creativity with friends and family. Each muffin is a reminder of those cherished baking moments with my mother and the joy of creating something beautiful and delicious.

Ingredients:

1 3/4 cups all-purpose flour
2 teaspoons baking powder
1/2 teaspoon salt
1/2 cup unsalted butter, softened
1 cup granulated sugar
2 large eggs
1 teaspoon vanilla extract
1/2 cup milk
2 tablespoons cocoa powder

Prep Time: 20 minutes
Cook Time: 20-25 minutes
Yield: 12 muffins

Instructions:

  1. Preheat the oven to 350°F (175°C). Line a muffin tin with paper liners or grease the cups.
  2. In a medium bowl, whisk together the flour, baking powder, and salt.
  3. In a large bowl, cream the butter and sugar until light and fluffy. Beat in the eggs one at a time, then stir in the vanilla extract.
  4. Gradually add the dry ingredients to the wet ingredients, alternating with the milk, starting and ending with the dry ingredients. Mix until just combined.
  5. Divide the batter in half. Stir the cocoa powder into one half of the batter.
  6. Spoon the vanilla and chocolate batters alternately into the muffin cups, filling each about 3/4 full. Use a toothpick or a knife to swirl the batters together gently.
  7. Bake for 20-25 minutes, or until a toothpick inserted into the center of a muffin comes out clean.
  8. Let the muffins cool in the tin for 5 minutes, then transfer to a wire rack to cool completely.

Pro Tips:

  • Ensure all ingredients are at room temperature for a smoother batter.
  • Don't overmix the batter to keep the muffins tender.

Secret Tips:

Add a teaspoon of instant coffee to the chocolate batter to enhance the chocolate flavor.

Serving Options:

Serve these marble muffins as a delightful breakfast treat or as a sweet snack with your afternoon coffee.

Health Benefits:

For a healthier version, use whole wheat flour instead of all-purpose flour and reduce the sugar to 3/4 cup.

Variations & Customization Options:

Add a handful of chocolate chips to the batter for extra chocolatey goodness.
Experiment with different extract flavors like almond or orange for a unique twist.

These Marble Muffins are a fun and delicious way to enjoy the best of both vanilla and chocolate in every bite. They're sure to be a hit with everyone who tries them. 

Happy baking!
Sam

Saturday, 23 March 2024

SnackSavy Series | Samah's Cheesy Breadsticks

Today is a special day on Sam's Baking Blog as we celebrate the birthday of my beloved sister, Samah. In honor of her love for cheese and warm spirit, I present to you Samah's Birthday Cheese Breadsticks. These breadsticks are not just a snack; they're a tribute to the joy and warmth Samah brings into our lives.

Origin Story: Cheesy Breadsticks

Cheesy breadsticks are a popular appetizer and snack, loved for their gooey, cheesy goodness and crispy edges. These delightful breadsticks can be enjoyed on their own or paired with a variety of dips, making them a versatile addition to any meal.

Historical Roots

The concept of breadsticks, also known as "grissini," originated in Italy, specifically in the region of Piedmont, around the 17th century. These thin, crunchy breadsticks were created to aid the digestion of the Duke of Savoy, who had digestive issues. Over time, breadsticks became a staple in Italian cuisine and spread throughout Europe and the rest of the world.

The addition of cheese to breadsticks is a more recent evolution, likely influenced by the popularity of cheesy bread in American and Italian-American cuisine. Combining the simplicity of breadsticks with the richness of cheese creates a comforting and satisfying snack that appeals to a wide audience.

Cultural Significance

Cheesy breadsticks hold a special place in American cuisine, particularly as a popular item in Italian-American restaurants and pizzerias. They are often served as an appetizer or a side dish, accompanied by marinara sauce, garlic butter, or ranch dressing for dipping. The combination of warm, melty cheese and crispy bread makes them a favorite for gatherings, parties, and casual meals.

In addition to their presence in restaurants, cheesy breadsticks have become a popular homemade snack. They are relatively easy to prepare and can be customized with different types of cheese and seasonings to suit personal preferences.

Personal Connection

My connection to cheesy breadsticks began during my college years. They were a favorite late-night snack, often shared with friends during study sessions or game nights. The aroma of freshly baked bread and melting cheese was always comforting and inviting, making them a go-to choice for casual get-togethers.

Inspired by those memories, I decided to create my own version of cheesy breadsticks at home. The key was to find the perfect balance between the crispy exterior and the gooey, cheesy interior. After experimenting with various recipes and techniques, I found that using a blend of mozzarella and parmesan provided the best flavor and texture.

Recipe Evolution

Creating the perfect cheesy breadsticks involves a few key steps. The dough should be soft and slightly elastic, which helps achieve a light and airy texture. Adding a touch of garlic powder and Italian seasoning to the dough enhances the flavor, making each bite more savory and delicious.

The cheese mixture is crucial for achieving the desired gooeyness. A combination of mozzarella for meltiness and parmesan for flavor works best. Sprinkling additional cheese on top before baking creates a crispy, golden crust that adds to the overall appeal.

Baking the breadsticks at a high temperature ensures they cook quickly and develop a beautiful golden color. Serving them with a side of marinara sauce or garlic butter for dipping adds an extra layer of flavor and makes them even more irresistible.

Sharing the Tradition

Today, cheesy breadsticks are a staple in my home, especially for movie nights and casual gatherings. They are the snack I make when I want to share a taste of comfort and nostalgia with friends and family. Each batch is a reminder of the joy of sharing good food with loved ones.

Ingredients:

✅For the Dough:

2 cups all-purpose flour
1 tablespoon sugar
1 teaspoon salt
1 tablespoon instant yeast
3/4 cup warm water
2 tablespoons olive oil

✅For the Topping:

2 tablespoons unsalted butter, melted
1/2 teaspoon garlic powder
1/2 teaspoon dried oregano
1 1/2 cups shredded mozzarella cheese (extra cheesy for Samah)
1/4 cup grated Parmesan cheese
Marinara sauce for dipping (optional)

Prep Time: 20 minutes (plus 1 hour for dough rising)
Cook Time: 15 minutes
Yield: 12-15 breadsticks

Instructions:

✅Make the Dough:

  1. In a large bowl, mix together the flour, sugar, salt, and yeast. Add the warm water and olive oil, and stir until a soft dough forms.
  2. Turn the dough out onto a floured surface and knead for about 5 minutes, until smooth and elastic.
  3. Place the dough in a greased bowl, cover with a damp cloth, and let it rise in a warm place for about 1 hour, or until doubled in size.

✅Preheat & Prepare:

  1. Preheat the oven to 425°F (220°C). Line a baking sheet with parchment paper or a silicone baking mat.
  2. Punch down the risen dough and roll it out on a lightly floured surface to a rectangle about 1/4 inch thick. Transfer the dough to the prepared baking sheet.
  3. Mix together the melted butter, garlic powder, and oregano. Brush the mixture evenly over the surface of the dough.
  4. Sprinkle the extra cheesy mozzarella and grated Parmesan evenly over the dough.
  5. Using a pizza cutter or a sharp knife, cut the dough into strips about 1 inch wide.
  6. Bake in the preheated oven for 15 minutes, or until the cheese is melted and bubbly and the edges are golden brown.
  7. Allow the breadsticks to cool for a few minutes before separating them. Serve warm with marinara sauce for dipping, if desired.

Pro Tips:

  • Ensure the water is warm (about 110°F) to activate the yeast properly.
  • You can let the dough rise in a slightly warm oven (turned off) with the light on to provide a gentle warmth.

Secret Tips:

For an extra golden and crispy crust, brush the breadsticks with a little more melted butter right before baking.

Serving Options

These homemade cheese breadsticks are perfect as an appetizer or a side dish with your favorite pasta or soup.

Health Benefits:

Opt for whole wheat flour instead of all-purpose flour for a healthier version with more fiber.

Variations & Customization Options:

  • Add some chopped fresh herbs like basil or rosemary to the dough for a flavorful twist.
  • Experiment with different cheeses like cheddar or gouda for a new taste experience.

These Homemade Cheese Breadsticks are a testament to the joy of baking from scratch. With their warm, cheesy goodness, they're sure to become a favorite for any occasion. Enjoy the process and the delicious results!

Happy Birthday Samoha!
Sam

Moist Chunky Banana Muffins

Welcome back to Sam's Baking Blog! Today, I'm whipping up a batch of Lovely Banana Muffins that are perfect for a quick breakfast or a sweet snack. These muffins are moist, flavorful, and packed with the goodness of bananas.

Origin Story: Chunky Banana Muffins

Chunky Banana Muffins are a delightful and comforting treat, combining the natural sweetness of ripe bananas with the satisfying texture of chunky mix-ins like nuts and chocolate chips. These muffins are perfect for breakfast, a snack, or a dessert, and they bring a touch of home-baked goodness to any occasion.

Historical Roots

Banana bread and muffins have a rich history that dates back to the 1930s. During the Great Depression, bakers sought ways to use overripe bananas that would otherwise go to waste. This frugality led to the creation of banana bread, a recipe that quickly became popular in American households. The advent of baking powder and baking soda in the 19th century made it easier to create quick breads like banana bread and muffins, which do not require yeast.

The muffin, in its modern form, is an American innovation, evolving from the traditional English muffin and gaining popularity in the United States in the 19th century. Muffins became a convenient and versatile baked good, ideal for incorporating fruits, nuts, and other ingredients.

Cultural Significance

Banana muffins, in particular, have become a staple in American baking. They are cherished for their moist texture and rich banana flavor. Adding chunky ingredients like nuts, chocolate chips, or even dried fruits elevates the standard banana muffin, making it more indulgent and satisfying.

These muffins are often enjoyed as a comforting breakfast or snack, providing a quick and nutritious option for busy mornings. They are also a popular choice for school lunches, bake sales, and casual gatherings, loved by both children and adults.

Personal Connection

My journey with Chunky Banana Muffins began with my grandmother's recipe. She would always save overripe bananas, knowing that they were perfect for baking. Her kitchen was often filled with the sweet aroma of banana bread and muffins. The joy of mashing the bananas, mixing the batter, and watching the muffins rise in the oven is a cherished memory from my childhood.

Inspired by my grandmother's recipe, I started experimenting with different mix-ins to add more texture and flavor to the muffins. Chopped walnuts, dark chocolate chips, and even a sprinkle of cinnamon quickly became my favorite additions. These chunky mix-ins not only enhanced the flavor but also provided a satisfying crunch in every bite.

Recipe Evolution

Creating the perfect Chunky Banana Muffin involves a few key steps. The bananas should be very ripe, with brown spots on the peel, to ensure they are sweet and easy to mash. Using both baking powder and baking soda helps the muffins rise and gives them a light, fluffy texture.

The batter should be mixed gently to avoid overworking the gluten in the flour, which can make the muffins tough. Adding the chunky mix-ins at the end ensures they are evenly distributed throughout the batter. Baking the muffins at a high temperature initially, then lowering it, helps create a domed top that is both attractive and delicious.

Sharing the Tradition

Today, Chunky Banana Muffins are a favorite in my household. They are the muffins I bake when I want to share a taste of home and comfort with friends and family. Each bite is a reminder of my grandmother's kitchen and the joy of creating something special from simple ingredients.

Ingredients:

1 1/2 cups all-purpose flour
1 teaspoon baking powder
1 teaspoon baking soda
1/2 teaspoon salt
3 ripe bananas, mashed
3/4 cup granulated sugar
1 egg, lightly beaten
1/3 cup unsalted butter, melted
1 teaspoon vanilla extract
1/2 cup walnuts or chocolate chips (optional)


Prep Time: 15 minutes
Cook Time: 20-25 minutes
Yield: 12 muffins

Instructions:

  1. Preheat the oven to 350°F (175°C). Line a muffin tin with paper liners or grease the cups.
  2. In a large bowl, whisk together the flour, baking powder, baking soda, and salt.
  3. In another bowl, mix the mashed bananas, sugar, egg, melted butter, and vanilla extract until well combined.
  4. Add the wet ingredients to the dry ingredients and stir just until combined. Do not overmix. Fold in the walnuts or chocolate chips if using.
  5. Divide the batter evenly among the muffin cups, filling each about 3/4 full.
  6. Bake for 20-25 minutes, or until a toothpick inserted into the center of a muffin comes out clean.
  7. Let the muffins cool in the pan for 5 minutes, then transfer to a wire rack to cool completely.

Pro Tips:

  • Use overripe bananas for the best flavor and sweetness.
  • Do not overmix the batter to ensure the muffins stay tender.

Secret Tips:

Add a pinch of cinnamon or nutmeg to the batter for a warm, spicy note.

Serving Options:

Serve the muffins warm with a pat of butter or a drizzle of honey.

Health Benefits:

Bananas are a great source of potassium and dietary fiber.

Variations & Customization Options:

  • Substitute whole wheat flour for half of the all-purpose flour for a healthier option.
  • Add a tablespoon of flaxseed meal for an extra boost of fiber and nutrients.

These Lovely Banana Muffins are a delightful treat that's easy to make and perfect for any time of day. Whether you're enjoying them for breakfast or as a snack, they're sure to bring a smile to your face.

Happy baking!

Sam

Twisted Temptation Marble Cake

Welcome back to Sam's Baking Blog! Today, we're diving into the world of classic bakes with a Simple Marble Cake. This cake combines the best of both worlds with its beautiful swirls of vanilla and chocolate, making it a treat for both the eyes and the taste buds.

Origin Story: Marble Cake

Marble cake is a dessert that captivates both the eyes and the palate with its beautiful swirls of chocolate and vanilla. This cake has a storied history that reflects the blending of culinary traditions across continents and centuries.

Historical Roots

The concept of marble cake is believed to have originated in Germany in the 19th century, where it was known as "Marmor Kuchen." The cake was named for its resemblance to marble stone, created by swirling light and dark batters together. This technique was brought to America by German immigrants, where it quickly became popular.

In the United States, marble cake evolved into a beloved classic, often featured in cookbooks from the 1800s. The American version typically used chocolate and vanilla batters, creating a harmonious blend of flavors that appealed to a wide audience. The visual appeal of the marbled effect, combined with the delicious taste, made it a staple for celebrations and gatherings.

Cultural Significance

Marble cake holds a special place in various cultures due to its aesthetic and taste. In Germany, it is traditionally enjoyed with afternoon coffee, embodying the cozy, convivial spirit of "Kaffee und Kuchen" (coffee and cake). In America, marble cake became a popular choice for birthdays, holidays, and other special occasions, symbolizing a blend of classic flavors and family traditions.

The cake's versatility allows for numerous variations. Some recipes incorporate spices like cinnamon or nutmeg, while others use different types of chocolate or flavorings to create unique twists on the classic marble cake.

Personal Connection

My fascination with marble cake began during a trip to a small bakery in a picturesque German village. The baker explained the history of the cake and demonstrated how to create the perfect marble effect by carefully swirling the batters. Watching the transformation from simple ingredients to a beautiful, marbled cake was mesmerizing and inspired me to recreate it at home.

Determined to perfect my own version, I experimented with different recipes and techniques. I found that using high-quality cocoa powder and real vanilla extract made a significant difference in both the taste and appearance of the cake. The challenge was to achieve a balanced swirl, ensuring that each slice had an enticing mix of chocolate and vanilla.

Recipe Evolution

Creating the perfect marble cake involves a few key steps. The batters for the chocolate and vanilla layers should be mixed separately to ensure distinct flavors. The chocolate batter is typically enhanced with cocoa powder and sometimes melted chocolate, while the vanilla batter is flavored with vanilla extract.

To create the marble effect, spoonfuls of each batter are alternately placed in the baking pan. A knife or skewer is then used to gently swirl the batters together, creating the signature marbled pattern. Care must be taken not to overmix, as this can cause the batters to blend too much and lose the distinct marbling.

Baking the cake at a moderate temperature ensures it cooks evenly and develops a beautiful golden crust. The result is a cake that is both visually stunning and delicious, with a perfect balance of chocolate and vanilla flavors.

Sharing the Tradition

Today, marble cake remains a favorite in my home. It is the cake I bake when I want to share a taste of nostalgia and creativity with friends and family. Each slice is a reminder of the rich history and the joy of creating something beautiful and delicious.

Ingredients:

1/2 cup unsalted butter, softened
1 cup granulated sugar
3 large eggs
2 teaspoons vanilla extract
1 3/4 cups all-purpose flour
2 teaspoons baking powder
1/2 teaspoon salt
1/2 cup milk
2 tablespoons cocoa powder


Prep Time: 20 minutes
Cook Time: 35-40 minutes
Yield: 1 (9x5-inch) loaf

Instructions:

  1. Preheat the oven to 350°F (175°C). Grease and flour a 9x5-inch loaf pan.
  2. In a large bowl, cream together the butter and sugar until light and fluffy. Add the eggs one at a time, beating well after each addition. Stir in the vanilla extract.
  3. In a separate bowl, whisk together the flour, baking powder, and salt. Gradually add the dry ingredients to the wet ingredients, alternating with the milk, starting and ending with the dry ingredients. Mix until just combined.
  4. Divide the batter in half. Stir the cocoa powder into one half of the batter.
  5. Spoon the vanilla and chocolate batters alternately into the prepared pan. Use a knife to swirl the batters together gently.
  6. Bake for 35-40 minutes, or until a toothpick inserted into the center comes out clean.
  7. Let the cake cool in the pan for 10 minutes, then transfer to a wire rack to cool completely.

Pro Tips:

  • Ensure all ingredients are at room temperature for a smoother batter.
  • Don't overmix the batter to keep the cake tender.

Secret Tips:

Add a tablespoon of strong brewed coffee to the chocolate batter to enhance the chocolate flavor.

Serving Options:

Dust with powdered sugar or drizzle with a simple glaze for added sweetness.

Health Benefits:

For a healthier version, use whole wheat flour instead of all-purpose flour and reduce the sugar to 3/4 cup.

Variations & Customization Options:

  • For a festive twist, add a teaspoon of orange zest to the vanilla batter.
  • Mix in some chopped nuts or chocolate chips into the batter for added texture.

This Simple Marble Cake is a timeless classic that's perfect for any occasion. Whether you're enjoying a slice with your afternoon tea or serving it as a dessert at a gathering, it's sure to be a hit. 

Happy baking!

Sam

Wednesday, 20 March 2024

Heavenly Light Tea-Time Cake

Welcome back to Sam's Baking Blog! Today, we're going to whip up a classic favorite - an Easy Fluffy Tea Cake. This cake is perfect for pairing with your afternoon tea or coffee, and its light, airy texture is sure to impress your guests.

Origin Story: Light Tea-Time Cake

A Light Tea-Time Cake is the epitome of simplicity and elegance, perfect for enjoying with a cup of tea in the afternoon. This cake is known for its delicate crumb, subtle flavors, and the ability to be paired with a variety of toppings or enjoyed plain. The concept of tea-time cakes has a rich history, deeply rooted in British culinary traditions.

Historical Roots

The tradition of afternoon tea began in Britain in the early 19th century, credited to Anna, the Duchess of Bedford. She found herself hungry in the long stretch between lunch and dinner and began inviting friends to join her for an afternoon snack of tea and light refreshments. This practice quickly became a social event, and soon, the idea of afternoon tea was embraced by the upper echelons of society and eventually by the middle class.

Light tea-time cakes were a staple at these gatherings, chosen for their simplicity and elegance. These cakes were designed to be light and not overly sweet, making them a perfect accompaniment to the robust flavors of tea. Classic examples include sponge cakes, Madeira cakes, and Victoria sponge cakes, all known for their light and airy textures.

Cultural Significance

Tea-time cakes hold a special place in British culture, symbolizing refinement and tradition. They are often associated with the leisurely practice of afternoon tea, a time to relax, socialize, and enjoy light refreshments. The tradition of afternoon tea has spread globally, and with it, the popularity of tea-time cakes.

The versatility of tea-time cakes also adds to their charm. They can be flavored with citrus, vanilla, or almond, and paired with fresh fruit, whipped cream, or a simple dusting of powdered sugar. This adaptability allows them to fit seamlessly into various cultural traditions and personal preferences.

Personal Connection

My interest in light tea-time cakes began during a visit to a quaint tea room in the English countryside. The experience of enjoying a slice of delicate cake with a perfectly brewed cup of tea was unforgettable. Inspired by this, I decided to recreate the experience at home.

After experimenting with different recipes, I found that the key to a perfect light tea-time cake is in the balance of ingredients and the method of mixing. Whipping the eggs and sugar to a light, fluffy consistency before gently folding in the flour and other ingredients helps achieve a delicate crumb. Adding a touch of citrus zest or a splash of vanilla enhances the flavor without overpowering the simplicity of the cake.

Recipe Evolution

Creating the perfect Light Tea-Time Cake involves a few key steps. The ingredients should be at room temperature to ensure they blend smoothly. Whipping the eggs and sugar until they are pale and fluffy helps incorporate air, which contributes to the cake's light texture. Folding in the flour gently prevents the batter from deflating, ensuring a tender crumb.

The cake can be baked in a variety of pans, from loaf tins to round cake pans, and can be finished with a simple glaze, a dusting of powdered sugar, or served with fresh berries and cream. The simplicity of the cake allows it to be a versatile base for various toppings and accompaniments.

Sharing the Tradition

Today, Light Tea-Time Cake is a favorite in my household, especially when hosting afternoon tea or casual gatherings. It is the cake I bake when I want to offer something light yet satisfying, perfect for enjoying with a hot cup of tea. Each slice is a reminder of the timeless tradition of afternoon tea and the joy of sharing simple, elegant treats with friends and family.

Ingredients:

1/2 cup unsalted butter, softened
1 cup granulated sugar
2 large eggs
1 teaspoon vanilla extract
1 1/2 cups all-purpose flour
1 1/2 teaspoons baking powder
1/4 teaspoon salt
1/2 cup milk

Prep Time: 15 minutes
Cook Time: 25-30 minutes
Yield: 1 (8-inch) cake

Instructions:

  1. Preheat the oven to 350°F (175°C). Grease and flour an 8-inch round cake pan.
  2. In a large bowl, cream together the butter and sugar until light and fluffy. Add the eggs one at a time, beating well after each addition. Stir in the vanilla extract.
  3. In a separate bowl, whisk together the flour, baking powder, and salt. Gradually add the dry ingredients to the wet ingredients, alternating with the milk, starting and ending with the dry ingredients. Mix until just combined.

  4. Pour the batter into the prepared cake pan and smooth the top. Bake for 25-30 minutes, or until a toothpick inserted into the center comes out clean.
  5. Let the cake cool in the pan for 10 minutes, then transfer to a wire rack to cool completely.

Pro Tips:

  • Ensure your butter is at room temperature for easier creaming.
  • Do not overmix the batter to maintain the cake's fluffy texture.

Secret Tips:

Add a tablespoon of lemon zest or orange zest to the batter for a citrusy twist.

Serving Options:

Dust with powdered sugar or serve with a dollop of whipped cream and fresh berries.

Health Benefits:

Opt for whole wheat flour for a healthier version with more fiber.

Variations & Customization Options:

  • Fold in 1/2 cup of blueberries or raspberries into the batter for a fruity variation.
  • Add a teaspoon of almond extract instead of vanilla for a nutty flavor.

This Easy Fluffy Tea Cake is a versatile and delightful treat that's perfect for any occasion. Whether you're hosting a tea party or just craving something sweet, this cake is sure to satisfy. 

Happy baking!
Sam

Tuesday, 19 March 2024

Sunshine Citrus Bliss - Whole Orange Cake

Welcome to another easy-bake recipe on Sam's Baking Blog! Today, we're making a Whole Orange Blender Cake that's bursting with citrus flavor and incredibly simple to prepare.

Origin Story: Whole Orange Cake

Whole Orange Cake is a delightful and fragrant dessert that incorporates the entire orange, peel and all, creating a moist and flavorful cake. This unique approach to baking with oranges results in a cake that is both rich in citrus flavor and beautifully aromatic.

Historical Roots

The practice of using whole fruits in baking has been around for centuries, rooted in the desire to minimize waste and maximize flavor. Whole Orange Cake likely evolved from traditional Mediterranean and Middle Eastern recipes, where citrus fruits have long been a staple in both sweet and savory dishes.

In particular, oranges have a rich history in Mediterranean cuisine, brought to Europe by Arab traders in the 10th century. The use of whole oranges in baking is a testament to the resourcefulness and ingenuity of these culinary traditions, transforming the entire fruit into a delicious and aromatic dessert.

Cultural Significance

Whole Orange Cake holds a special place in various culinary traditions, particularly in regions where citrus fruits are abundant. The cake's use of whole oranges, including the zest and pith, ensures a deep and intense orange flavor that is difficult to achieve with juice or zest alone. This method also makes the cake incredibly moist and tender.

In Mediterranean and Middle Eastern cultures, citrus fruits symbolize freshness and vitality. Using the whole fruit in baking not only enhances the flavor but also captures the essence of these cultural values. Whole Orange Cake is often enjoyed during festive occasions and family gatherings, celebrated for its vibrant taste and aromatic qualities.

Personal Connection

My discovery of Whole Orange Cake came during a visit to a charming bakery in Sicily. The baker proudly shared her recipe, explaining how using the entire orange gave the cake its unique flavor and texture. Inspired by this experience, I decided to recreate the cake at home, experimenting with different varieties of oranges and baking techniques.

The process of blending the whole orange, including the peel, was initially surprising but proved to be the secret to the cake's rich flavor. The natural oils in the orange peel added a depth of flavor that was both refreshing and complex. The cake quickly became a favorite, enjoyed with a cup of tea or coffee.

Recipe Evolution

Creating the perfect Whole Orange Cake involves a few key steps. Selecting the right oranges is crucial; organic oranges are preferred to avoid any pesticides on the peel. The oranges should be boiled briefly to soften them and reduce any bitterness from the peel.

Blending the whole oranges into a puree ensures that the flavor is evenly distributed throughout the cake. The batter is then mixed with typical cake ingredients such as flour, sugar, eggs, and butter, often with the addition of ground almonds or almond flour for extra texture and moisture.

Baking the cake at a moderate temperature helps to maintain its moist texture while developing a golden crust. A simple glaze made from powdered sugar and orange juice can be added to enhance the citrus flavor and add a touch of sweetness.

Sharing the Tradition

Today, Whole Orange Cake is a cherished recipe in my home. It is the cake I bake when I want to share a taste of Mediterranean sunshine with friends and family. Each slice is a celebration of the vibrant flavor and natural beauty of oranges, embodying the joy of baking with whole, fresh ingredients.

For those who want to try this delightful recipe, you can find the detailed instructions on my blog here. This recipe is a celebration of the rich culinary traditions of the Mediterranean and a testament to the simple pleasures of home baking.

Ingredients:

2 whole oranges, washed and roughly chopped (seeds removed)
3 eggs
1 cup sugar
1/2 cup vegetable oil
2 cups all-purpose flour
1 tablespoon baking powder
1/2 teaspoon salt
Powdered sugar for dusting (optional)

Prep Time: 15 minutes
Cook Time: 35-40 minutes
Yield: 1 (9-inch) cake

Instructions:

  1. Preheat the oven to 350°F (175°C). Grease and flour a 9-inch round cake pan.
  2. In a blender, blend the oranges, eggs, sugar, and vegetable oil until smooth.
  3. In a large bowl, mix the flour, baking powder, and salt. Add the wet ingredients from the blender and stir until just combined.
  4. Pour the batter into the prepared pan and bake for 35-40 minutes, or until a toothpick inserted into the center comes out clean.
  5. Let the cake cool in the pan for 10 minutes, then transfer to a wire rack to cool completely. Dust with powdered sugar before serving, if desired.

Pro Tips:

  • Ensure your oranges are thoroughly washed since you'll be using the whole fruit.
  • Don't overmix the batter to keep the cake light and fluffy.

Secret Tips:

Add a teaspoon of orange zest to the batter for an extra burst of citrus flavor.

Serving Options:

Serve as is, or with a dollop of whipped cream or a scoop of vanilla ice cream.

Health Benefits:

Oranges are a good source of vitamin C and antioxidants, which can help boost your immune system.

Variations & Customization Options:

  • Add a teaspoon of vanilla extract or a pinch of cinnamon for a different flavor profile.
  • For a gluten-free version, substitute all-purpose flour with almond flour or a gluten-free flour blend.

This Whole Orange Blender Cake is a perfect example of how simple ingredients can create a delightful and flavorful dessert. It's sure to be a hit at your next gathering or as a treat for your family. 

Happy baking!
Sam