Turning Your Wishes into Sweet Realities, One Homemade Treat at a Time. 🌟
Showing posts with label Sweet Treats. Show all posts

Wednesday, 31 January 2024

Irresistible Lemon Poppy Seed Cake Recipe

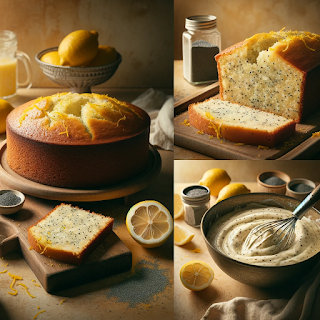
Prepare to be delighted by the zesty and enchanting flavors of our Lemon Poppy Seed Cake! This homemade treat is a burst of sunshine on your taste buds, combining the tangy goodness of lemons with the delightful crunch of poppy seeds. Every bite is a journey into citrusy bliss, making it the perfect dessert for any occasion.

Origin Story: Lemon Poppy Seed Cake

The Lemon Poppy Seed Cake is a timeless dessert that balances the bright, zesty flavor of lemons with the subtle crunch of poppy seeds. This cake has a rich history that spans continents and centuries, making it a beloved treat in many cultures.

Historical Roots

The history of poppy seeds dates back to ancient civilizations. They were cultivated by the Sumerians as early as 3400 BC and were widely used in the cuisines of the ancient Egyptians, Greeks, and Romans. Poppy seeds were valued not only for their flavor but also for their supposed medicinal properties.

Lemons, on the other hand, are believed to have originated in Northeast India or China and were brought to Europe by Arab traders in the Middle Ages. The combination of lemon and poppy seeds in baking likely began in Europe, where both ingredients were popular. The bright citrus flavor of lemons provided a perfect contrast to the nutty taste of poppy seeds, creating a delightful and refreshing dessert.

Cultural Significance

Lemon poppy seed cakes and breads have become staples in many countries. In Europe, particularly in Germany and Austria, poppy seeds are a common ingredient in pastries and cakes. In the United States, lemon poppy seed cakes gained popularity in the mid-20th century, often enjoyed as a breakfast treat or a light dessert.

The cake’s appeal lies in its versatility and the simple yet sophisticated flavor combination. It’s a favorite for afternoon tea, brunches, and festive occasions. The addition of a lemon glaze or cream cheese frosting can elevate it from a humble cake to an elegant dessert.

Personal Connection

My journey with lemon poppy seed cake began during a summer vacation in a quaint village in the south of France. The local bakery was renowned for its lemon poppy seed cake, and one bite was enough to make me fall in love with it. The cake was moist and tender, bursting with the fresh flavor of lemons and the delightful texture of poppy seeds.

Inspired by this experience, I set out to recreate the cake in my own kitchen. The key was to find the perfect balance of tartness from the lemons and the right amount of poppy seeds to add texture without overpowering the cake. I experimented with different types of lemon juice and zest, as well as various ratios of poppy seeds, until I achieved a recipe that captured the essence of that unforgettable cake.

Recipe Evolution

Creating the perfect lemon poppy seed cake involved several tweaks and refinements. I discovered that using both lemon juice and zest in the batter added a more intense lemon flavor. Incorporating yogurt or sour cream into the batter helped keep the cake moist and tender. For an extra burst of flavor, I sometimes add a lemon syrup that soaks into the warm cake, enhancing its citrusy goodness.

To finish the cake, I often drizzle a simple lemon glaze over the top. The glaze adds a touch of sweetness and a beautiful shine, making the cake as visually appealing as it is delicious. For special occasions, I might top it with a cream cheese frosting, which pairs wonderfully with the tangy lemon flavor.

Sharing the Tradition

Today, my lemon poppy seed cake is a favorite among friends and family. It’s the cake I bake for spring and summer gatherings, and it never fails to bring smiles and compliments. Each slice is a reminder of that summer in France and the joy of discovering new flavors.

Ingredients
:

✅For the Cake:

2 cups all-purpose flour
2 tablespoons poppy seeds
1 1/2 teaspoons baking powder
1/2 teaspoon baking soda
1/2 teaspoon salt
1 cup (2 sticks) unsalted butter, softened
1 1/2 cups granulated sugar
3 large eggs
Zest of 2 lemons
1/4 cup fresh lemon juice
1 teaspoon pure vanilla extract
1 cup sour cream

✅For the Lemon Glaze:

1 cup powdered sugar
2-3 tablespoons fresh lemon juice
Zest of 1 lemon

Preparation Time: 15 minutes
Baking Time: 50-60 minutes
Yield: This recipe yields one delicious Lemon Poppy Seed Cake.

Instructions:

  1. Preheat your oven to 350°F (175°C). Grease and flour a 9x5-inch loaf pan.
  2. In a mixing bowl, whisk together the all-purpose flour, poppy seeds, baking powder, baking soda, and salt. Set aside.
  3. In a separate bowl, cream together the softened unsalted butter and granulated sugar until light and fluffy.
  4. Beat in the eggs one at a time, ensuring each is fully incorporated.
  5. Add the lemon zest, fresh lemon juice, and pure vanilla extract to the butter mixture. Mix until well combined.
  6. Gradually add the dry mixture to the wet mixture, alternating with the sour cream. Begin and end with the dry mixture. Mix until just combined.
  7. Pour the batter into the prepared loaf pan and spread it evenly.
  8. Bake in the preheated oven for 50-60 minutes or until a toothpick inserted into the center comes out clean.
  9. While the cake is baking, prepare the lemon glaze. In a small bowl, whisk together the powdered sugar, fresh lemon juice, and lemon zest until smooth.
  10. Once the cake is done, remove it from the oven and let it cool in the pan for about 10 minutes. Then, transfer it to a wire rack.
  11. While the cake is still warm, drizzle the lemon glaze over the top. Allow the glaze to set before slicing and serving.

Pro Tips

  1. Fresh Lemons: Use fresh lemons for the best flavor. Their zest and juice infuse the cake with bright citrus notes.
  2. Room Temperature Ingredients: Ensure your butter, eggs, and sour cream are at room temperature for smoother blending.
  3. Poppy Seed Freshness: Check the expiration date on your poppy seeds to ensure they are fresh and flavorful.

Secret Tips

  1. Zest Technique: When zesting lemons, use a fine grater or zester, being careful not to include the bitter white pith.
  2. Even Glazing: For a beautiful glaze, drizzle it over the cake while it's still warm. The warmth helps the glaze soak in and create a lovely finish.


"Indulge in the irresistible allure of our Lemon Poppy Seed Cake, where every slice is a burst of lemony delight. Whether you're enjoying it with a cup of tea, sharing it with loved ones, or savoring it all on your own, this cake is a treat that brightens your day and leaves you craving for more."

Enjoy creating and savoring this mouthwatering Lemon Poppy Seed Cake recipe!
Sam Salih

Oatmeal Raisin Cookies Recipe

Indulge in the wholesome goodness of Oatmeal Raisin Cookies, where chewy oats and plump raisins come together to create a delightful treat. These cookies are a perfect blend of sweet and hearty, making them a comforting favorite.

Origin Story: Oatmeal Raisin Cookies

The creation of my Oatmeal Raisin Cookies is a unique blend of history, innovation, and a personal touch that brings warmth to every bite. This story is not just about a recipe, but about the journey that made these cookies a beloved treat in my kitchen and beyond.

Historical Roots and Cultural Significance

The roots of oatmeal raisin cookies date back to ancient times when oats were first cultivated by the Scots around 1000 BC. Oats were a hardy grain that could grow in the cooler, wetter climate of Scotland, making them a staple in the Scottish diet. They were commonly used in porridge, bannocks, and eventually in baked goods.

The modern oatmeal raisin cookie likely evolved from traditional Scottish oatcakes, which were a simple, unleavened form of bread made from oats. As oats spread across Europe and eventually to America, they were embraced for their nutritional benefits. The introduction of raisins to these oat-based treats added a natural sweetness and a chewy texture, transforming them into a more indulgent dessert.

Personal Connection

My personal connection to oatmeal raisin cookies began during a family trip to a small village in Scotland. I was fascinated by the local bakeries that showcased traditional oatcakes and pastries. One particular bakery, with its warm and inviting aroma, stood out. The baker, an elderly woman with a passion for her craft, shared stories of how oats were a symbol of resilience and sustenance for her ancestors.

Inspired by this experience, I returned home determined to create a version of these oat-based treats that would honor both the traditional Scottish roots and the sweet, comforting flavors I love. I started with a basic oatmeal cookie recipe but felt it needed something more to make it special.

Recipe Evolution

In my quest to perfect the recipe, I experimented with various ingredients and techniques. I discovered that soaking the raisins in warm water or a bit of rum before adding them to the dough made them plumper and more flavorful. Adding a touch of cinnamon and nutmeg brought a warm, aromatic depth to the cookies.

The real breakthrough came when I decided to brown the butter before mixing it into the dough. This added a rich, nutty flavor that elevated the cookies to a new level. Each bite of the final version of my oatmeal raisin cookies offers a perfect balance of crispy edges, chewy centers, and bursts of sweet, juicy raisins.

Sharing the Tradition

These cookies have become a staple in my household and are often requested by friends and family. They are the cookies I bake when I want to bring a touch of home to gatherings or when I need a comforting treat to share. Each batch is a testament to the rich history and personal journey that brought this recipe to life.

For those who want to experience the unique flavors and comforting texture of my oatmeal raisin cookies, you can find the detailed recipe on my blog here. This recipe is a tribute to the resilience and creativity of generations past and a celebration of the simple joys of home baking. Enjoy making and sharing these delicious cookies with your loved ones.

Ingredients
:

1 cup (2 sticks) unsalted butter, softened
1 cup granulated sugar
1 cup packed brown sugar
2 large eggs
1 teaspoon pure vanilla extract
1 1/2 cups all-purpose flour
1 teaspoon baking soda
1 teaspoon ground cinnamon
1/2 teaspoon salt
3 cups old-fashioned rolled oats
1 1/2 cups raisins

  • Preparation Time: 15 minutes
    Baking Time: 10-12 minutes
    Yield: This recipe makes approximately 36 delicious Oatmeal Raisin Cookies.
  • Instructions:

  1. Preheat your oven to 350°F (175°C). Line a baking sheet with parchment paper.
  2. In a mixing bowl, cream together the softened unsalted butter, granulated sugar, and brown sugar until the mixture is light and fluffy.
  3. Beat in the eggs one at a time, then stir in the pure vanilla extract.
  4. In a separate bowl, whisk together the all-purpose flour, baking soda, ground cinnamon, and salt. Gradually add this dry mixture to the butter and sugar mixture and mix until just combined.
  5. Stir in the old-fashioned rolled oats and raisins until they are evenly distributed in the cookie dough.
  6. Drop rounded tablespoons of cookie dough onto the prepared baking sheet. Leave some space between each cookie as they will spread during baking.
  7. Bake in the preheated oven for 10-12 minutes or until the edges are golden but the centers are still soft. Don't overbake for a chewy texture.
  8. Remove the cookies from the oven and let them cool on the baking sheet for a few minutes before transferring them to a wire rack to cool completely.
Crafting Wisdom 🍪
  1. Room Temperature Ingredients: Make sure your butter is softened to room temperature. This allows it to cream easily with the sugars, resulting in a smoother cookie dough.
  2. High-Quality Vanilla: Use pure vanilla extract for the best flavor. It adds a wonderful aroma and enhances the overall taste of the cookies.
  3. Don't Overmix: When adding the dry ingredients to the wet mixture, mix only until they are combined. Overmixing can lead to tough cookies.
  4. Use Old-Fashioned Rolled Oats: Old-fashioned oats provide the best texture for these cookies. Avoid using quick oats, which can make the cookies too soft.
  5. Plump Raisins: If your raisins are dry, plump them by soaking them in hot water for a few minutes, then draining them. This ensures they are soft and juicy in the cookies.
  6. Chill the Dough: If you have time, refrigerate the cookie dough for about 30 minutes before baking. Chilled dough results in thicker, less spread-out cookies.
Baking Magic Tricks ✨

  1. Cinnamon Enhancement: For an extra layer of flavor, toast the ground cinnamon in a dry skillet for a minute or two before adding it to the dough. It intensifies the cinnamon aroma.
  2. Customize with Nuts: If you like nutty cookies, add a cup of chopped walnuts or pecans to the dough. The combination of nuts and raisins is delightful.
  3. Flavor Infusion: Infuse the raisins with flavor by soaking them in a bit of orange juice or rum before adding them to the dough. This adds a subtle citrus or boozy note to your cookies.
  4. Giant Cookies: For jumbo cookies, use an ice cream scoop to portion out the dough. Bake them a little longer, and you'll have big, chewy cookies.
  5. Freezing Cookie Dough: You can freeze portions of cookie dough to have fresh-baked cookies whenever you like. Scoop out portions onto a baking sheet, freeze until solid, then transfer to a freezer bag. Bake them straight from the freezer, adding a minute or two to the baking time.

Why these cookies are special:

Oatmeal Raisin Cookies are a timeless classic with a warm, homey feel. The combination of oats and raisins not only adds sweetness but also a delightful texture that's both chewy and satisfying.

How to enjoy them:

These cookies are perfect for any occasion, whether you're craving a sweet snack or want to share a comforting treat with loved ones. Enjoy them with a glass of milk, a cup of tea, or simply on their own.

Let’s get baking:

With this easy recipe, you can whip up a batch of Oatmeal Raisin Cookies in no time. Share the joy of freshly baked cookies with family and friends.

Happy baking!
Sam Salih

          Tuesday, 30 January 2024

          Authentic Almond-Flaked Basbosa Recipe

          Discover the authentic flavors of Basbosa, a beloved Middle Eastern dessert that combines the sweetness of semolina cake with the fragrance of simple syrup. This timeless recipe has been cherished for generations and is sure to become a favorite in your kitchen.

          Origin Story: Almond-Flaked Basbosa Recipe

          Basbosa, also known as Basbousa or Harissa in some regions, is a traditional Middle Eastern dessert that has delighted palates for generations. This sweet, semolina-based cake soaked in syrup is a staple at family gatherings and festive occasions. The addition of almond flakes to the classic Basbosa recipe adds a delightful crunch and a nutty flavor that complements its rich, moist texture.

          Historical Roots

          The origins of Basbosa can be traced back to ancient times, with its roots in the Levantine and Egyptian cuisines. The name "Basbosa" comes from the Arabic word "basbous," meaning "to pour," which refers to the method of pouring syrup over the cake after baking. This dessert has been enjoyed for centuries, particularly during celebrations like Ramadan, Eid, and family get-togethers.

          Cultural Significance

          Basbosa holds a special place in Middle Eastern culture, symbolizing hospitality and generosity. It is often prepared in large quantities and shared with neighbors, friends, and family members. The recipe is passed down through generations, each adding their own twist to create a unique version. In many households, making Basbosa is a cherished tradition, bringing people together in the kitchen to create something sweet and memorable.

          Personal Connection

          My love for Basbosa began in my childhood, watching my mother prepare this delightful cake for special occasions. I was always fascinated by the simplicity of its ingredients—semolina, sugar, yogurt, and butter—and how they came together to create such a delicious treat. The highlight, of course, was when the syrup was poured over the freshly baked cake, infusing it with sweetness and moisture.

          As I grew older, I began experimenting with the traditional recipe, adding my own touches to enhance its flavor and texture. The addition of almond flakes came from a desire to add a bit of crunch and a nutty aroma to the classic Basbosa. Toasting the almond flakes before adding them to the batter brings out their rich flavor, making the cake even more delightful.

          Recipe Evolution

          Creating the perfect Almond-Flaked Basbosa required several trials and adjustments. I found that lightly toasting the almond flakes before incorporating them into the batter gave the cake a deeper, richer flavor. The key to a perfect Basbosa lies in the balance of syrup—too much can make it soggy, and too little can leave it dry. Achieving the right consistency of the batter and the correct amount of syrup was a journey of delicious experimentation.

          Sharing the Tradition

          Today, Almond-Flaked Basbosa is a favorite in my home. It’s the dessert I make when I want to treat my family to something special or when I want to bring a taste of tradition to a gathering. Sharing this cake with friends and family allows me to pass on the love and warmth of my heritage, connecting us through the universal language of food.

          Ingredients
          :

          ✅For the Basbosa Cake:

          1 cup semolina
          1 cup plain yogurt
          1/2 cup granulated sugar
          1/2 cup unsalted butter, melted
          1/2 cup desiccated coconut
          1/4 cup almond flakes
          1 teaspoon vanilla extract
          1 teaspoon baking powder
          A pinch of salt


          ✅For the Simple Syrup:

          1 cup granulated sugar
          1/2 cup water
          1 tablespoon lemon juice
          Optional: A few drops of rosewater or orange blossom water

          Preparation Time: 20 minutes
          Baking Time: 30-35 minutes
          Cooling Time: 1-2 hours
          Yield: This recipe makes approximately 16 delicious Basbosa pieces.

          Instructions:

          🥮Preparing the Simple Syrup:

          1. In a saucepan, combine 1 cup of granulated sugar and 1/2 cup of water.
          2. Place the saucepan over medium heat and stir until the sugar completely dissolves.
          3. Add 1 tablespoon of lemon juice to the mixture. Lemon juice helps prevent the syrup from crystallizing.
          4. Optionally, add a few drops of rosewater or orange blossom water for a fragrant twist. Stir well.
          5. Bring the syrup to a gentle boil, then reduce the heat and simmer for about 10 minutes, or until the syrup slightly thickens.
          6. Remove the syrup from heat and let it cool while you prepare the Basbosa cake.

          🥮Preparing the Basbosa Cake:

          1. Preheat your oven to 350°F (175°C). Grease a baking dish (about 9x9 inches) with butter or cooking spray.
          2. In a mixing bowl, combine 1 cup of semolina, 1/2 cup of granulated sugar, 1/2 cup of melted unsalted butter, 1/2 cup of plain yogurt, 1/2 cup of desiccated coconut, 1/4 cup of almond flakes, 1 teaspoon of vanilla extract, 1 teaspoon of baking powder, and a pinch of salt.
          3. Mix all the ingredients until well combined. The mixture should have a thick batter-like consistency.
          4. Pour the Basbosa batter into the greased baking dish and spread it evenly.
          5. Using a sharp knife, score the surface of the batter into diamond or square shapes. Place one almond flake in the center of each piece.
          6. Bake in the preheated oven for about 30-35 minutes, or until the Basbosa turns golden brown on top.
          7. Remove the Basbosa from the oven and immediately pour the cooled simple syrup evenly over the hot cake.
          8. Allow the Basbosa to absorb the syrup and cool to room temperature before serving.

          1. Pro Tips:

          • Mix Thoroughly: When combining the ingredients for the Basbosa cake, make sure everything is well mixed. Pay extra attention to the semolina to ensure it's evenly coated with the wet ingredients. This helps achieve a consistent texture.
          • Preheat the Oven: Always preheat your oven before placing the Basbosa inside. Baking in a preheated oven ensures even cooking and consistent results.
          • Use a Toothpick Test: To check if the Basbosa is done, insert a toothpick into the center. If it comes out clean or with just a few crumbs clinging to it, the cake is ready. If there's wet batter on the toothpick, bake for a few more minutes and test again.
          • Pour Syrup on Hot Cake: When pouring the simple syrup over the Basbosa, make sure the cake is hot out of the oven. This allows the syrup to be absorbed more effectively, ensuring a moist and flavorful result.
          • Let it Cool: After adding the syrup, let the Basbosa cool to room temperature in the baking dish. This allows the cake to absorb the syrup properly and develop its signature sweet and moist texture.
          • Chill Before Serving: For the best flavor and texture, you can refrigerate the Basbosa for a few hours before serving. This makes it easier to cut into neat pieces.
          • Store Properly: If you have leftovers, store the Basbosa in an airtight container at room temperature or in the refrigerator. It stays fresh for several days and can even be frozen for longer storage.

          Why Basbosa is special:

          Basbosa is more than just a dessert; it's a symbol of hospitality and celebration in Middle Eastern culture. The cake's semolina texture, combined with the aromatic syrup, creates a heavenly treat that satisfies both the sweet tooth and the senses.

          How to enjoy it:

          Serve Basbosa as a delightful ending to a Middle Eastern meal or enjoy it with a cup of tea or coffee. The fragrant syrup and nutty semolina will transport your taste buds to the heart of the Middle East.

          Let’s get baking:

          Follow this simple recipe to create your own Basbosa and experience the joy of sharing a time-honored dessert with friends and family.

          Even a non-professional baker can create a perfect batch of Almond-Flaked Basbosa that's sure to impress friends and family.

          Enjoy your baking adventure!

          Sam