Turning Your Wishes into Sweet Realities, One Homemade Treat at a Time. 🌟
Showing posts with label Traditional Sweets. Show all posts

Sunday, 19 May 2024

Kanafeh with a Twist: Berry and Cream Filling

Kanafeh is a traditional Middle Eastern dessert known for its crispy, buttery crust and creamy filling. This recipe adds a modern twist with a berry and cream filling, offering a refreshing variation that will delight your taste buds and impress your guests.

Origin Story: Kanafeh with Cream Filling

Kanafeh is a beloved Middle Eastern dessert, renowned for its rich, creamy filling and crispy, buttery crust. Traditionally, it is filled with cheese and soaked in a sweet syrup, making it a decadent treat that is often enjoyed during special occasions and celebrations. My version of Kanafeh, with a berry and cream filling, offers a fresh twist on this classic, infusing it with vibrant flavors and a touch of elegance.

Historical Roots

Kanafeh (also spelled Knafeh or Kunafa) has its roots in the Levant region and is particularly popular in countries like Lebanon, Palestine, Jordan, and Syria. The origins of this dessert can be traced back to the 10th century, where it was first made in the kitchens of the Fatimid Caliphs in Egypt. The name "Kanafeh" is believed to derive from the Arabic word "kanaf," meaning to protect or cover, referring to the pastry that covers the filling.

Traditionally, Kanafeh is made with thin strands of shredded phyllo dough called kataifi, layered with a cheese filling and baked until golden and crispy. It is then soaked in a fragrant sugar syrup, often infused with rose or orange blossom water. The result is a dessert that is both crispy and creamy, sweet and aromatic.

Cultural Significance

Kanafeh is more than just a dessert; it is a symbol of celebration and hospitality in Middle Eastern culture. It is often served during festive occasions such as Ramadan, Eid, and weddings. Each region has its own variations, with different types of cheese and methods of preparation. The communal aspect of making and sharing Kanafeh adds to its significance, bringing families and friends together to enjoy this delightful treat.

Personal Connection

My journey with Kanafeh began during a family trip to Lebanon. I was captivated by the sight of pastry shops displaying large trays of Kanafeh, their golden crusts glistening with syrup. The combination of textures and flavors was unlike anything I had ever tasted. Inspired by this experience, I decided to create my own version of Kanafeh, incorporating the freshness of berries and the creaminess of mascarpone cheese.

The idea of adding a berry and cream filling came from my love for summer fruits and the desire to create a lighter, more refreshing version of this classic dessert. The tartness of the berries balances the sweetness of the syrup, while the creamy mascarpone adds a luxurious touch. This twist on Kanafeh retains the essence of the traditional dish while offering a new and exciting flavor profile.

Recipe Evolution

Creating the perfect Berry and Cream Kanafeh involved several trials and adjustments. I found that using a combination of fresh and dried berries provided the best balance of flavors and textures. The mascarpone cheese filling needed to be smooth and rich, complementing the crunch of the kataifi pastry.

I also experimented with different syrups, eventually settling on a light honey syrup infused with a hint of lemon zest. This syrup enhances the natural sweetness of the berries and adds a subtle citrus note, tying the dessert together beautifully.

Sharing the Tradition

Today, Kanafeh with a Twist: Berry and Cream Filling is a favorite at family gatherings and special occasions. It’s a dessert that brings a touch of elegance and freshness, surprising and delighting those who taste it. Each bite is a celebration of the rich culinary heritage of the Middle East, infused with the vibrant flavors of summer berries.


Ingredients

500g kataifi (shredded phyllo dough)
1 cup unsalted butter, melted
2 cups mixed berries (strawberries, blueberries, raspberries)
1 cup sugar
2 tablespoons cornstarch
1 tablespoon lemon juice
1 teaspoon vanilla extract
2 cups ricotta cheese
1 cup heavy cream
1 cup water
1/2 cup honey
1 tablespoon rosewater

Preparation Time: 20 minutes
Cooking Time: 30 minutes
Yield: Serves 8

Instructions

  1. Preheat the oven to 175°C (350°F).
  2. In a saucepan, combine mixed berries, 1/2 cup sugar, cornstarch, and lemon juice.
  3. Cook over medium heat until the mixture thickens. Stir in vanilla extract and let cool.
  4. In a large bowl, separate the kataifi dough and mix with melted butter until well coated.
  5. Press half of the dough into a greased baking dish.
  6. In a bowl, mix ricotta cheese with heavy cream until smooth.
  7. Spread the cream mixture over the kataifi dough in the baking dish.
  8. Add the cooled berry mixture on top of the cream layer.
  9. Cover with the remaining kataifi dough, pressing gently.
  10. Bake for 30 minutes or until golden brown.
  11. n a saucepan, combine water, remaining sugar, honey, and rosewater.
  12. Bring to a boil and simmer for 10 minutes.
  13. Pour the hot syrup over the baked kanafeh.
  14. Let it soak for a few minutes before serving.

Pro Tips:

  • Fresh or Frozen Berries: Both fresh and frozen berries can be used. If using frozen, ensure they are thawed and drained.
  • Layering: Press the kataifi dough firmly for a crispier crust.

Secret Tips

  • Extra Flavor: Add a pinch of ground cardamom to the berry mixture for a hint of spice.
  • Cheese Variation: Substitute ricotta with mozzarella for a more traditional texture.

Serving Options

Serve warm with a scoop of vanilla ice cream or a dollop of whipped cream.

Health Benefits:

  • Berries: Rich in antioxidants and vitamins.
  • Ricotta Cheese: A good source of protein and calcium.

Variations & Customization Options:

  • Nutty Kanafeh: Add a layer of crushed pistachios or walnuts between the cream and berry layers.
  • Citrus Twist: Add orange zest to the syrup for a citrusy flavor.

This Kanafeh with a Twist combines the best of traditional Middle Eastern flavors with a refreshing berry and cream filling. Perfect for special occasions or as a unique treat, it’s a delightful way to enjoy a classic dessert with a modern touch.

Happy Baking!
Sam

Baklava - A Middle Eastern Eternal Delicacy

Baklava is a beloved Middle Eastern dessert known for its layers of flaky pastry, rich nut filling, and sweet syrup. Perfect for any occasion, this delightful treat is sure to impress.

Origin Story: Baklava - A Middle Eastern Eternal Delicacy

Baklava is a renowned Middle Eastern dessert known for its layers of flaky phyllo pastry, filled with chopped nuts and sweetened with syrup or honey. This indulgent treat has a rich history and cultural significance that spans centuries and borders.

Historical Roots

The origins of baklava are widely debated, with various countries laying claim to its creation. The most widely accepted theory is that baklava has its roots in the Ottoman Empire, where it was perfected and popularized. The oldest known recipe for a similar dessert comes from the Assyrian Empire around the 8th century BCE, where layers of bread dough were filled with nuts and honey.

The modern version of baklava that we know today was likely developed in the kitchens of the Topkapi Palace in Istanbul, during the Ottoman Empire's reign. The use of thin, layered pastry dough called phyllo (from the Greek word meaning "leaf") and the method of layering it with nuts and sweet syrup became a hallmark of Ottoman cuisine and spread throughout the empire.

Cultural Significance

Baklava holds a special place in Middle Eastern, Mediterranean, and Balkan cuisines. It is often associated with celebrations and special occasions, such as Ramadan, Eid, Christmas, and weddings. Each region has its own variations, using different types of nuts, spices, and syrups to create unique versions of this beloved dessert.

In Turkey, baklava is typically made with pistachios or walnuts and sweetened with a simple syrup flavored with lemon. In Greece, almonds are commonly used, and the syrup often includes honey and cinnamon. In Lebanon and Syria, rose or orange blossom water is added to the syrup, giving the baklava a distinct floral aroma.

Personal Connection

My love for baklava began during family gatherings, where this dessert was always the star of the dessert table. I was fascinated by the intricate layers and the perfect balance of sweetness and nuttiness. The process of making baklava was a communal activity, with family members coming together to layer the phyllo, chop the nuts, and prepare the syrup.

I remember my grandmother teaching me the art of making baklava, emphasizing the importance of patience and precision. Each layer of phyllo had to be brushed with butter to ensure a crispy, golden texture, and the nuts had to be finely chopped to create a uniform filling. The syrup was poured over the hot baklava, allowing it to soak in and infuse each layer with sweetness.

Recipe Evolution

Creating the perfect baklava involves several key steps. The phyllo dough must be handled with care to prevent it from drying out and becoming brittle. The choice of nuts can vary based on personal preference, but a mix of pistachios, walnuts, and almonds often provides a delightful contrast of flavors and textures. Spices such as cinnamon, cardamom, and cloves can be added to the nut mixture to enhance the flavor.

The syrup, typically made from a mixture of sugar, water, and lemon juice, can be flavored with honey, rose water, or orange blossom water. Pouring the hot syrup over the freshly baked baklava is crucial to achieving the perfect texture, as it allows the pastry to absorb the sweetness while retaining its crispiness.

Sharing the Tradition

Today, baklava remains a favorite in my family, and I continue to make it for special occasions and gatherings. Each bite is a reminder of the rich cultural heritage and the joy of sharing something delicious with loved ones.

Ingredients

1 package of phyllo dough
2 cups mixed nuts (walnuts, pistachios, almonds), finely chopped
1 cup unsalted butter, melted
1 teaspoon ground cinnamon
1 cup granulated sugar
1 cup water
1/2 cup honey
1 teaspoon vanilla extract
1 teaspoon lemon juice

Preparation Time: 30 minutes
Cooking Time: 45 minutes
Yield: Serves 20

Instructions

  1. Preheat your oven to 175°C (350°F).
  2. Mix the chopped nuts with ground cinnamon in a bowl.
  3. Brush a 9x13 inch baking dish with melted butter.
  4. Lay a sheet of phyllo dough in the dish and brush with butter.
  5. Repeat until you have 8 layers.
  6. Sprinkle a thin layer of the nut mixture over the phyllo.
  7. Add 2 more layers of phyllo, brushing each with butter.
  8. Repeat the layering process until all the nuts are used.
  9. Top with 8 more layers of phyllo dough, brushing each layer with butter.
  10. Cut into diamond or square shapes before baking.
  11. Bake in the preheated oven for about 45 minutes, or until golden brown and crisp.
  12. While the baklava is baking, combine sugar, water, honey, vanilla extract, and lemon juice in a saucepan.
  13. Bring to a boil, reduce heat, and simmer for 10 minutes.
  14. Remove the baklava from the oven and immediately pour the hot syrup over it.
  15. Let it cool completely before serving.

Pro Tips

  • Phyllo Dough Handling: Keep the phyllo dough covered with a damp cloth to prevent it from drying out while working.
  • Even Layers: Make sure to evenly distribute the nut mixture for a consistent taste in every bite.

Secret Tips

  • Flavor Enhancement: Add a pinch of ground cloves or cardamom to the nut mixture for an extra depth of flavor.
  • Syrup Absorption: Pour the syrup over the baklava as soon as it comes out of the oven to ensure maximum absorption.

Serving Options:

Serve baklava at room temperature, garnished with a sprinkle of crushed pistachios or a drizzle of chocolate.

Variations & Customization Options:

  • Chocolate Baklava: Add a layer of chocolate chips between the nut layers for a decadent twist.
  • Fruit-Infused: Incorporate dried fruits like apricots or dates into the nut mixture.

Baklava is a timeless dessert that brings joy to any gathering. Its flaky layers, rich nuts, and sweet syrup make it an irresistible treat. Enjoy making and sharing this heavenly dessert!

Happy Baking!
Sam

Friday, 29 March 2024

Eid Essence Ginger Tea Biscuits AKA (Biscuit Al-Nashader)

Welcome back to Sam's Baking Blog! As we approach the end of the holy month of Ramadan, it's time to prepare for the joyous celebration of Eid. Today, we're making Ginger-Flavored Tea Biscuits, also known as Biscuit Al-Nashader. These crisp, delicately spiced biscuits are a traditional favorite in many Muslim countries during Eid celebrations. Perfect for sharing with family and friends, these biscuits are a delightful way to mark the conclusion of Ramadan and the beginning of festive Eid gatherings.

Origin Story: Ginger Tea Biscuits 

Ginger Tea Biscuits, also known as Biscuit Al-Nashader, are a traditional treat in Sudan and other parts of the Middle East, especially popular during Eid celebrations. These biscuits are characterized by their light, crunchy texture, achieved using baker's ammonia (nashader) as a leavening agent.

Historical Roots

The use of baker's ammonia in baking dates back centuries and was common in many traditional recipes before the advent of modern baking powder. This ingredient, known for creating a very light and crisp texture, is particularly suitable for biscuits like Biscuit Al-Nashader. The origins of these biscuits are rooted in Middle Eastern and North African culinary traditions, where spices and unique leavening agents were often used to create distinctive baked goods.

Cultural Significance

In Sudan and other Middle Eastern countries, Biscuit Al-Nashader is a staple during festive occasions, particularly Eid al-Fitr and Eid al-Adha. These biscuits are often prepared in large batches and shared with family and friends, symbolizing hospitality and celebration. The preparation and sharing of these biscuits are a beloved tradition, bringing families together in the kitchen.

Recipe Insights

Biscuit Al-Nashader typically includes simple ingredients such as flour, sugar, eggs, and butter, with ginger as the primary flavoring. The unique aspect of these biscuits is the use of baker's ammonia, which contributes to their signature texture. The dough is often rolled out, cut into shapes, and then baked until golden and crisp.

Adding ginger to these biscuits not only enhances their flavor but also provides a warming, aromatic quality that pairs perfectly with tea. Some variations of the recipe include additional flavorings like orange zest or vanilla, adding a unique twist to the traditional biscuits.

Personal Connection

My journey with Ginger Tea Biscuits began during an Eid celebration with friends from Sudan. The delightful aroma of ginger and the light, crispy texture of the biscuits made a lasting impression. Inspired by this experience, I set out to recreate the biscuits in my own kitchen. The key to perfecting the recipe was balancing the ginger flavor and achieving the right texture with baker's ammonia.

Sharing the Tradition

Today, Ginger Tea Biscuits are a favorite in my home, especially during festive occasions. They are the biscuits I bake when I want to share a taste of Middle Eastern tradition with my family and friends. Each batch is a celebration of cultural heritage and the joy of baking.

Ingredients:

2 cups all-purpose flour
1/2 cup granulated sugar
1/2 cup vegetable oil
1/4 cup unsalted butter, softened
1/4 cup milk
1 tablespoon baking powder
1 teaspoon ground ginger
1/2 teaspoon ammonium bicarbonate (nashader)
Pinch of salt

Prep Time: 15 minutes
Cook Time: 10-12 minutes
Yield: 24-30 biscuits

Instructions:

  1. Preheat the oven to 350°F (175°C). Line a baking sheet with parchment paper.
  2. In a large bowl, cream together the butter, oil, and sugar until light and fluffy.
  3. In a separate bowl, sift together the flour, baking powder, ground ginger, ammonium bicarbonate, and salt.
  4. Gradually add the dry ingredients to the wet ingredients, alternating with the milk, until a soft dough forms.
  5. Roll out the dough on a lightly floured surface to about 1/4 inch thickness. Use a cookie cutter to cut out the biscuits and place them on the prepared baking sheet.
  6. Bake for 10-12 minutes, or until the edges are lightly golden. Allow the biscuits to cool on the baking sheet for a few minutes before transferring them to a wire rack to cool completely.

Pro Tips:

  • Ensure the ammonium bicarbonate is finely ground for even distribution in the dough.
  • Do not overbake the biscuits to maintain their crisp texture.

Secret Tips:

For a more pronounced ginger flavor, add a tablespoon of finely grated fresh ginger to the dough.

Serving Options:

Serve these biscuits with a cup of mint tea or Arabic coffee for an authentic Middle Eastern experience.

Health Benefits:

Ginger is known for its anti-inflammatory properties and can aid in digestion.

Variations & Customization Options:

  • Add a pinch of ground cardamom or cinnamon to the dough for a different flavor profile.
  • Dip the cooled biscuits in melted chocolate for a sweet twist.

These Ginger-Flavored Tea Biscuits are a delightful addition to any tea or coffee break. Their crispy texture and subtle spice make them a perfect treat for any occasion. 

Enjoy baking and sharing these traditional biscuits!
Eid Mubarak!
Sam

Tuesday, 30 January 2024

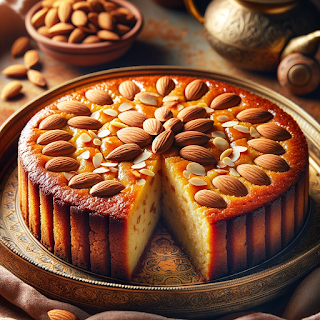
Authentic Almond-Flaked Basbosa Recipe

Discover the authentic flavors of Basbosa, a beloved Middle Eastern dessert that combines the sweetness of semolina cake with the fragrance of simple syrup. This timeless recipe has been cherished for generations and is sure to become a favorite in your kitchen.

Origin Story: Almond-Flaked Basbosa Recipe

Basbosa, also known as Basbousa or Harissa in some regions, is a traditional Middle Eastern dessert that has delighted palates for generations. This sweet, semolina-based cake soaked in syrup is a staple at family gatherings and festive occasions. The addition of almond flakes to the classic Basbosa recipe adds a delightful crunch and a nutty flavor that complements its rich, moist texture.

Historical Roots

The origins of Basbosa can be traced back to ancient times, with its roots in the Levantine and Egyptian cuisines. The name "Basbosa" comes from the Arabic word "basbous," meaning "to pour," which refers to the method of pouring syrup over the cake after baking. This dessert has been enjoyed for centuries, particularly during celebrations like Ramadan, Eid, and family get-togethers.

Cultural Significance

Basbosa holds a special place in Middle Eastern culture, symbolizing hospitality and generosity. It is often prepared in large quantities and shared with neighbors, friends, and family members. The recipe is passed down through generations, each adding their own twist to create a unique version. In many households, making Basbosa is a cherished tradition, bringing people together in the kitchen to create something sweet and memorable.

Personal Connection

My love for Basbosa began in my childhood, watching my mother prepare this delightful cake for special occasions. I was always fascinated by the simplicity of its ingredients—semolina, sugar, yogurt, and butter—and how they came together to create such a delicious treat. The highlight, of course, was when the syrup was poured over the freshly baked cake, infusing it with sweetness and moisture.

As I grew older, I began experimenting with the traditional recipe, adding my own touches to enhance its flavor and texture. The addition of almond flakes came from a desire to add a bit of crunch and a nutty aroma to the classic Basbosa. Toasting the almond flakes before adding them to the batter brings out their rich flavor, making the cake even more delightful.

Recipe Evolution

Creating the perfect Almond-Flaked Basbosa required several trials and adjustments. I found that lightly toasting the almond flakes before incorporating them into the batter gave the cake a deeper, richer flavor. The key to a perfect Basbosa lies in the balance of syrup—too much can make it soggy, and too little can leave it dry. Achieving the right consistency of the batter and the correct amount of syrup was a journey of delicious experimentation.

Sharing the Tradition

Today, Almond-Flaked Basbosa is a favorite in my home. It’s the dessert I make when I want to treat my family to something special or when I want to bring a taste of tradition to a gathering. Sharing this cake with friends and family allows me to pass on the love and warmth of my heritage, connecting us through the universal language of food.

Ingredients
:

✅For the Basbosa Cake:

1 cup semolina
1 cup plain yogurt
1/2 cup granulated sugar
1/2 cup unsalted butter, melted
1/2 cup desiccated coconut
1/4 cup almond flakes
1 teaspoon vanilla extract
1 teaspoon baking powder
A pinch of salt


✅For the Simple Syrup:

1 cup granulated sugar
1/2 cup water
1 tablespoon lemon juice
Optional: A few drops of rosewater or orange blossom water

Preparation Time: 20 minutes
Baking Time: 30-35 minutes
Cooling Time: 1-2 hours
Yield: This recipe makes approximately 16 delicious Basbosa pieces.

Instructions:

🥮Preparing the Simple Syrup:

  1. In a saucepan, combine 1 cup of granulated sugar and 1/2 cup of water.
  2. Place the saucepan over medium heat and stir until the sugar completely dissolves.
  3. Add 1 tablespoon of lemon juice to the mixture. Lemon juice helps prevent the syrup from crystallizing.
  4. Optionally, add a few drops of rosewater or orange blossom water for a fragrant twist. Stir well.
  5. Bring the syrup to a gentle boil, then reduce the heat and simmer for about 10 minutes, or until the syrup slightly thickens.
  6. Remove the syrup from heat and let it cool while you prepare the Basbosa cake.

🥮Preparing the Basbosa Cake:

  1. Preheat your oven to 350°F (175°C). Grease a baking dish (about 9x9 inches) with butter or cooking spray.
  2. In a mixing bowl, combine 1 cup of semolina, 1/2 cup of granulated sugar, 1/2 cup of melted unsalted butter, 1/2 cup of plain yogurt, 1/2 cup of desiccated coconut, 1/4 cup of almond flakes, 1 teaspoon of vanilla extract, 1 teaspoon of baking powder, and a pinch of salt.
  3. Mix all the ingredients until well combined. The mixture should have a thick batter-like consistency.
  4. Pour the Basbosa batter into the greased baking dish and spread it evenly.
  5. Using a sharp knife, score the surface of the batter into diamond or square shapes. Place one almond flake in the center of each piece.
  6. Bake in the preheated oven for about 30-35 minutes, or until the Basbosa turns golden brown on top.
  7. Remove the Basbosa from the oven and immediately pour the cooled simple syrup evenly over the hot cake.
  8. Allow the Basbosa to absorb the syrup and cool to room temperature before serving.

  1. Pro Tips:

  • Mix Thoroughly: When combining the ingredients for the Basbosa cake, make sure everything is well mixed. Pay extra attention to the semolina to ensure it's evenly coated with the wet ingredients. This helps achieve a consistent texture.
  • Preheat the Oven: Always preheat your oven before placing the Basbosa inside. Baking in a preheated oven ensures even cooking and consistent results.
  • Use a Toothpick Test: To check if the Basbosa is done, insert a toothpick into the center. If it comes out clean or with just a few crumbs clinging to it, the cake is ready. If there's wet batter on the toothpick, bake for a few more minutes and test again.
  • Pour Syrup on Hot Cake: When pouring the simple syrup over the Basbosa, make sure the cake is hot out of the oven. This allows the syrup to be absorbed more effectively, ensuring a moist and flavorful result.
  • Let it Cool: After adding the syrup, let the Basbosa cool to room temperature in the baking dish. This allows the cake to absorb the syrup properly and develop its signature sweet and moist texture.
  • Chill Before Serving: For the best flavor and texture, you can refrigerate the Basbosa for a few hours before serving. This makes it easier to cut into neat pieces.
  • Store Properly: If you have leftovers, store the Basbosa in an airtight container at room temperature or in the refrigerator. It stays fresh for several days and can even be frozen for longer storage.

Why Basbosa is special:

Basbosa is more than just a dessert; it's a symbol of hospitality and celebration in Middle Eastern culture. The cake's semolina texture, combined with the aromatic syrup, creates a heavenly treat that satisfies both the sweet tooth and the senses.

How to enjoy it:

Serve Basbosa as a delightful ending to a Middle Eastern meal or enjoy it with a cup of tea or coffee. The fragrant syrup and nutty semolina will transport your taste buds to the heart of the Middle East.

Let’s get baking:

Follow this simple recipe to create your own Basbosa and experience the joy of sharing a time-honored dessert with friends and family.

Even a non-professional baker can create a perfect batch of Almond-Flaked Basbosa that's sure to impress friends and family.

Enjoy your baking adventure!

Sam

Dates Maamoul Recipe

Indulge in the delightful flavors of Dates Maamoul, a traditional Middle Eastern pastry filled with sweet, spiced dates. This easy recipe brings together simple ingredients to create a delicious treat that's perfect for sharing with family and friends.

Origin Story: Dates Maamoul 

The story of Dates Maamoul is deeply woven into the cultural tapestry of the Middle East, where it has been a cherished delicacy for centuries. Maamoul, a type of shortbread cookie traditionally filled with dates, nuts, or figs, holds a significant place in the hearts and homes of many, especially during festive occasions like Eid, Easter, and Christmas.

Historical Roots

The origins of Maamoul can be traced back to ancient civilizations in the Levant, where dates have been a staple food for thousands of years. The use of dates in desserts is a tradition that dates back to Mesopotamian times, where they were often combined with nuts and honey to create sweet treats. Over time, these simple date-filled pastries evolved into the more sophisticated Maamoul cookies we know today.

Cultural Significance

Maamoul cookies are more than just a dessert; they are a symbol of hospitality and celebration. In many Middle Eastern households, the preparation of Maamoul is a communal activity, bringing together family members of all ages. The process is often elaborate, involving special molds to create the distinctive patterns on the cookies. These molds, often carved from wood, are passed down through generations, each one carrying the history and memories of countless celebrations.

Personal Connection

My journey with Dates Maamoul began in my mother's kitchen. I remember the excitement in the air as we gathered to prepare for Eid. My mother, with her years of experience, would lead the process, showing us how to prepare the dough, make the date filling, and use the molds to shape the cookies. The sweet aroma of dates and the rich smell of butter filled the house, creating an atmosphere of warmth and anticipation.

Each step in the process was a lesson in tradition and patience. We would carefully pit and chop the dates, often adding a hint of cinnamon or cardamom to enhance their flavor. The dough, made with a blend of semolina and flour, had to be kneaded to the perfect consistency. Using the molds required a delicate touch, pressing the dough just right to create intricate designs without breaking it.

Recipe Evolution

Over the years, I’ve made a few tweaks to the traditional recipe to make it my own while preserving its essence. I’ve experimented with different spices, added a touch of orange blossom water for extra fragrance, and even tried using different types of dates. Each variation brings a new dimension to the cookies, but the core of the recipe remains unchanged—a testament to its timeless appeal.

Sharing the Tradition

Today, I continue to make Dates Maamoul, not just for special occasions but whenever I want to feel connected to my heritage and family. Sharing these cookies with friends and loved ones allows me to pass on a piece of my culture and the stories that come with it. Every time I make them, I’m reminded of my grandmother and the joy of those communal baking sessions.


Ingredients:

✅For the Maamoul Dough:
2 cups semolina
1/2 cup unsalted butter, melted
1/4 cup rosewater (or orange blossom water)
1/4 cup milk
1/4 cup granulated sugar
A pinch of salt
✅For the Dates Filling:
1 1/2 cups pitted dates, finely chopped
1 tablespoon unsalted butter
1/2 teaspoon ground cinnamon (optional)
1/2 teaspoon ground cardamom
1/4 cup chopped nuts (such as walnuts or pistachios, optional)

Preparation Time: 30 minutes
Baking Time: 15-20 minutes
Yield: This recipe yields approximately 20-24 delightful Dates Maamoul cookies.
Instructions:

🍥Preparing the Dates Filling:

  1. In a saucepan, melt 1 tablespoon of unsalted butter over low heat.
  2. Add the finely chopped dates to the melted butter and cook them over low heat, stirring continuously. Cook until the dates become soft and form a thick paste. This should take about 5-7 minutes.
  3. If desired, add ground cinnamon and ground cardamom to the date mixture for extra flavor. Stir well.
  4. Remove the date mixture from the heat and let it cool to room temperature. You can also mix in chopped nuts at this stage for added crunch and flavor.

🍥Preparing the Maamoul Dough:

  1. In a mixing bowl, combine the semolina, melted butter, rosewater (or orange blossom water), milk, granulated sugar, and a pinch of salt. Mix until you have a soft and smooth dough.
  2. Divide the dough into small portions and shape them into balls.
  3. Take one dough ball and flatten it in your hand to create a small disc.
  4. Place a small amount of the cooled dates filling (about 1 teaspoon) in the center of the disc.
  5. Carefully seal the edges of the dough to encase the dates filling and shape it into a small, round or oval cookie. You can use a Maamoul mold to create decorative patterns on top if you have one.
  6. Repeat the process with the remaining dough and dates filling.

🍥Baking:

  1. Preheat your oven to 350°F (175°C).
  2. Place the shaped Maamoul cookies on a baking sheet lined with parchment paper.
  3. Bake in the preheated oven for about 15-20 minutes or until they turn slightly golden on the bottom.
  4. Remove from the oven and let the Maamoul cookies cool completely on a wire rack.

Why these Maamoul are special:

Dates Maamoul offers a harmonious blend of semolina dough and a luscious dates filling, enriched with the warmth of spices like cinnamon and cardamom. These cookies are a delightful combination of textures and flavors, making them a cherished dessert in Middle Eastern cuisine.

How to enjoy them:

Serve Dates Maamoul with a cup of hot tea or coffee for a cozy and satisfying snack. These cookies are perfect for celebrating special occasions, sharing during gatherings, or enjoying as a sweet treat any time of the day.

Let’s get baking:

With simple ingredients and step-by-step instructions, you can easily recreate the magic of Dates Maamoul in your own kitchen. Prepare a batch, share the joy, and savor the delicious taste of this timeless Middle Eastern treat.

Happy baking!
Sam Salih