Turning Your Wishes into Sweet Realities, One Homemade Treat at a Time. 🌟

Tuesday, 6 February 2024

Homestead Honey Wheat Bread

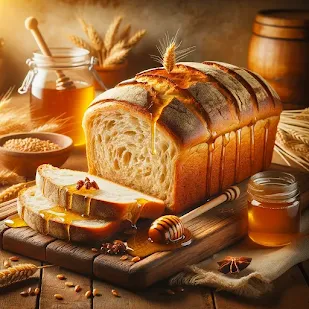
Welcome to the heartwarming world of homemade bread with my Honey Wheat Bread. Crafted with care and kissed by the sweetness of honey, this wholesome loaf is a testament to the simple joys of baking. With a perfect blend of whole wheat and all-purpose flour, it offers a delightful balance of flavor and nutrition. Whether toasted for breakfast or used for sandwiches, every slice is a comforting reminder of the love and warmth that goes into homemade bread.

Origin Story: Homestead Honey Wheat Bread

Homestead Honey Wheat Bread is a wholesome, hearty bread that combines the nutty flavor of whole wheat with the natural sweetness of honey. This bread is perfect for sandwiches, toast, or simply enjoying with a pat of butter. Its origins and evolution reflect the simple, rustic traditions of home baking.

Historical Roots

The use of whole wheat flour in bread dates back to ancient civilizations. Whole wheat bread was a staple in the diets of the Egyptians, Greeks, and Romans, valued for its nutritional content. Unlike refined white flour, whole wheat flour retains the bran and germ, providing more fiber, vitamins, and minerals.

Honey, one of the oldest sweeteners known to humanity, has been used in baking for centuries. Ancient Egyptians used honey to sweeten their breads and cakes. The combination of honey and whole wheat flour in bread reflects a long-standing tradition of using natural ingredients to enhance flavor and nutrition.

The term "homestead" evokes images of early American settlers who baked their own bread using ingredients they had on hand. Honey wheat bread became popular in the United States during the back-to-the-land movement of the 1960s and 70s, when people began to seek out whole, natural foods and embrace traditional methods of food preparation.

Cultural Significance

Honey wheat bread holds a special place in the culture of home baking. It represents a return to simpler times, when families baked their own bread from scratch. The use of whole wheat flour and honey reflects a commitment to wholesome, natural ingredients. This bread is often associated with health and wellness, as it combines the nutritional benefits of whole grains with the natural sweetness of honey.

Personal Connection

My interest in Homestead Honey Wheat Bread began when I started exploring healthier alternatives to store-bought bread. The process of making bread from scratch, using simple and natural ingredients, was both rewarding and comforting. I was inspired by the rustic charm of homestead baking and the satisfaction of creating a nourishing food staple at home.

Recipe Evolution

Creating the perfect Homestead Honey Wheat Bread involves a few key steps. The use of whole wheat flour gives the bread its characteristic nutty flavor and dense texture. Combining whole wheat flour with all-purpose flour can help lighten the texture, making the bread less dense and more palatable.

Honey not only adds sweetness but also helps to retain moisture in the bread, keeping it fresh longer. The yeast should be proofed in warm water with a bit of honey to ensure it is active and will rise properly. Kneading the dough well helps develop the gluten, giving the bread structure and chewiness.

Ingredients
:

2 1/4 teaspoons active dry yeast
1 1/2 cups warm water (about 110°F or 43°C)
1/4 cup honey
2 tablespoons olive oil
3 cups whole wheat flour
1 cup all-purpose flour
1 1/2 teaspoons salt


Preparation Time: 15 minutes
Rising Time: 1 hour 45 minutes
Baking Time: 30-35 minutes
Yield: This recipe yields one loaf of Honey Wheat Bread.

Instructions:

  1. Activate Yeast: In a small bowl, combine warm water, honey, and active dry yeast. Let it sit for about 5-10 minutes until foamy.
  2. Mix Dough: In a large mixing bowl, combine whole wheat flour, all-purpose flour, and salt. Add the yeast mixture and olive oil. Stir until a dough forms.
  3. Knead: Turn the dough onto a floured surface and knead for about 5-7 minutes until smooth and elastic.
  4. First Rise: Place the dough in a greased bowl, cover with a clean kitchen towel, and let it rise in a warm place for about 1 hour or until doubled in size.
  5. Shape and Second Rise: Punch down the dough and shape it into a loaf. Place it in a greased loaf pan. Cover and let it rise for another 30-45 minutes.
  6. Preheat Oven: Preheat your oven to 350°F (175°C).
  7. Bake: Bake the bread for 30-35 minutes or until the top is golden brown and the bread sounds hollow when tapped on the bottom.
  8. Cool: Remove the bread from the pan and let it cool on a wire rack.

Pro Tips

  1. Fresh Honey: Use quality honey for a rich and delightful flavor.
  2. Storage: To keep your bread fresh, store it in a sealed plastic bag or airtight container.

Secret Tips

  1. Warm Environment: Ensure that the dough rises in a warm, draft-free environment. A slightly warm oven (turned off) or a cozy corner in your kitchen can be ideal for a successful rise.
  2. Double Proofing: For an even lighter and fluffier loaf, consider a double rise. After the first rise, punch down the dough, shape it, and let it rise again before baking.
  3. Bread Flour: If you prefer a slightly lighter texture, you can replace a portion of the whole wheat flour with bread flour.
  4. Honey Drizzle: For an extra touch of sweetness and shine, lightly drizzle honey over the top of the bread just before baking.
  5. Steam Oven: To achieve a crustier crust, place a shallow pan of hot water on the bottom rack of your oven while baking. The steam created will enhance the crust.
  6. Cool Completely: Allow the bread to cool completely on a wire rack before slicing. This helps retain the moisture and ensures a perfect texture.

This Honey Wheat Bread is more than just a recipe; it's a slice of happiness. With its golden crust and tender crumb, it's an invitation to savor the simple pleasures of life. Whether you're a seasoned baker or a first-time bread maker, this recipe will fill your home with the comforting aroma of freshly baked bread. So roll up your sleeves, embrace the art of baking, and create a loaf that's filled with love and warmth.

It's the perfect addition to any meal and a delightful way to explore the world of homemade bread.

Happy Baking!
Sam


Monday, 5 February 2024

Frosty Pumpkin Spice Delight Muffins

 Embrace the spirit of winter with my'Winter Wonderland Pumpkin Muffins.' As the air turns crisp and the world outside is adorned in a blanket of cold, these muffins are your ticket to warmth and comfort. Crafted with the vibrant essence of freshly harvested pumpkins, they capture the magic of the season. Each bite is like a cozy hug from a crackling fireplace, a delightful blend of healthiness and pure indulgence that'll keep you snug and satisfied throughout the winter

Origin Story: Pumpkin Spice Muffins

Pumpkin Spice Delight Muffins are a seasonal favorite that capture the essence of autumn with their warm spices and rich pumpkin flavor. These muffins are perfect for cozy mornings, holiday brunches, or as a sweet snack. Their creation and evolution reflect the growing popularity of pumpkin spice and its cultural significance.

Historical Roots

The use of pumpkin in baking dates back to early American colonial times. Native Americans introduced pumpkins to the Pilgrims, who quickly adopted them into their diet. Pumpkin pies and breads became staples during the fall harvest season.

Pumpkin spice, a blend of cinnamon, nutmeg, ginger, and cloves, became popular in the mid-20th century as a convenient way to season pumpkin pie. The term "pumpkin spice" gained widespread recognition with the introduction of the Pumpkin Spice Latte by Starbucks in 2003, which sparked a cultural phenomenon. Since then, pumpkin spice has become synonymous with autumn, appearing in a wide range of products, including baked goods like muffins.

Cultural Significance

Pumpkin Spice Delight Muffins embody the comforting and nostalgic flavors of fall. They are often enjoyed during the cooler months, from late September through November, and are a staple at Halloween and Thanksgiving gatherings. The blend of spices not only enhances the natural sweetness of pumpkin but also evokes feelings of warmth and coziness.

The popularity of pumpkin spice has transcended its humble beginnings, becoming a cultural icon. Products featuring pumpkin spice are eagerly anticipated each year, and the flavor has a dedicated following. Pumpkin Spice Delight Muffins are a delicious way to indulge in this seasonal trend.

Personal Connection

My love for Pumpkin Spice Delight Muffins began during a fall trip to a local pumpkin patch. After a day of pumpkin picking, I visited the farm's bakery and tried their freshly baked pumpkin spice muffins. The aroma of spices and the moist, flavorful muffins left a lasting impression, inspiring me to recreate the experience at home.

Experimenting with different recipes, I found that using fresh pumpkin puree and a generous amount of spices resulted in the most flavorful muffins. Adding a streusel topping provided a delightful crunch that complemented the soft, moist interior.

Recipe Evolution

Creating the perfect Pumpkin Spice Delight Muffins involves a few key steps. Using fresh or canned pumpkin puree gives the muffins their rich, moist texture. The pumpkin spice blend should be well-balanced to enhance the flavor without overpowering it.

The batter is typically made with a combination of flour, sugar, eggs, oil, and spices. Mixing the dry and wet ingredients separately before combining them ensures a smooth batter. Adding mix-ins like chopped nuts or chocolate chips can add texture and extra flavor.

For a special touch, a streusel topping made from butter, sugar, and flour can be sprinkled on top before baking. This adds a crunchy, sweet layer that contrasts beautifully with the soft muffins.

Sharing the Tradition

Today, Pumpkin Spice Delight Muffins are a favorite in my household. They are the muffins I bake when I want to celebrate the arrival of fall or share a seasonal treat with friends and family. Each bite is a reminder of the cozy, comforting flavors of autumn.

Ingredients
:

1 1/2 cups fresh pumpkin puree (made from roasted or steamed pumpkin)
1/2 cup unsweetened applesauce
1/3 cup honey or maple syrup
2 large eggs
1 teaspoon pure vanilla extract
1 3/4 cups whole wheat flour
1 teaspoon baking soda
1/2 teaspoon baking powder
1/2 teaspoon ground cinnamon
1/4 teaspoon ground nutmeg
1/4 teaspoon ground cloves
1/4 teaspoon salt
1/2 cup chopped nuts or seeds (optional)
1/2 cup raisins or dried cranberries (optional)
  • Preparation Time: 15 minutes
    Baking Time: 20-25 minutes
    Yield: This recipe yields approximately 12 Pumpkin Muffins.

Instructions
:

  1. 🍥The Fresh Pumpkin Puree:

  2. Preheat your oven to 375°F (190°C). Cut a small pumpkin in half, scoop out the seeds, and place it cut-side down on a baking sheet. Roast for about 45 minutes or until the flesh is soft. 
  3. Scoop out the pumpkin flesh and puree it in a blender or food processor until smooth.

  4. 🍥The Muffin Batter:

  5. In a large mixing bowl, combine fresh pumpkin puree, unsweetened applesauce, honey (or maple syrup), eggs, and vanilla extract. Mix until well combined.
  6. In a separate bowl, whisk together whole wheat flour, baking soda, baking powder, ground cinnamon, ground nutmeg, ground cloves, and salt.
  7. Gradually add the dry ingredients to the wet ingredients and stir until just combined. If desired, fold in chopped nuts or seeds and raisins or dried cranberries.
  8. Preheat your oven to 350°F (175°C). Line a muffin tin with paper liners or grease it lightly. Fill each muffin cup about 3/4 full with the muffin batter.
  9. Bake for 20-25 minutes or until a toothpick inserted into the center of a muffin comes out clean.
  10. Cool the muffins in the tin for a few minutes, then transfer them to a wire rack to cool completely.

Pro Tips

  1. Fresh Pumpkin: Use freshly roasted or steamed pumpkin for the best flavor and nutrition. Canned pumpkin can be a convenient alternative.
  2. Customize Toppings: Feel free to top your muffins with a sprinkle of oats, chopped nuts, or a drizzle of honey before baking.

Secret Tips:

  1. Moisture Lock: Store your pumpkin muffins in an airtight container to keep them moist and fresh.


These Healthy Fresh Pumpkin Muffins bring the comfort and goodness of Winter to your table. With real pumpkin, whole wheat goodness, and a burst of spices, they're a wholesome treat for your taste buds and a nutritious choice for your well-being. Enjoy the flavors of the season in every bite!

Happy Baking!
Sam

Sunday, 4 February 2024

Sam's Zalabia: The Sweet Legacy of Generations

Discover the sweet legacy of generations with Sam's Zalabia, a timeless Middle Eastern dessert that embodies the spirit of unity and generosity. As we savor these golden, crispy bites, we honor a tradition that dates back centuries. Zalabia, also known as Luqaimat, emerged as a symbol of sharing and caring during Ramadan. Today, it remains a beloved treat, cherished for its sweetness and the love it represents.

Origin Story: Zalabia

Zalabia, also known as loukoumades or zulbia, is a traditional sweet treat enjoyed across various cultures, particularly in the Middle East, North Africa, and parts of South Asia. These deep-fried dough balls, soaked in syrup or honey, hold a special place in culinary history and are often associated with festive occasions and celebrations.

Historical Roots

The history of zalabia dates back to ancient times. It is believed that zalabia has its origins in the Middle East, with references found in early Arabic cookbooks from the Abbasid Caliphate period (8th-13th centuries). The dish spread across the Mediterranean and beyond, influenced by various cultures along the way.

In medieval Arab cookbooks, zalabia was described as a dessert made from a simple batter of flour, water, and yeast, fried until golden and then soaked in syrup. This method of preparation has remained relatively unchanged over centuries, highlighting the timeless appeal of this sweet treat.

Cultural Significance

Zalabia is deeply rooted in the culinary traditions of many countries, including Egypt, Lebanon, Syria, Iran, and Turkey. In each region, it goes by different names and may have slight variations in preparation, but the essence remains the same. In Egypt, for example, zalabia is often enjoyed during Ramadan, where it is served to break the fast. It symbolizes hospitality and is a staple at festive gatherings.

In Greece, a similar dish known as loukoumades is enjoyed, particularly during special occasions and religious festivals. These small, round doughnuts are typically drizzled with honey and sprinkled with cinnamon or sesame seeds.

In Iran, zulbia is a popular sweet during the Persian New Year (Nowruz) and Ramadan. It is often paired with another sweet called bamieh and is loved for its crispy texture and sweet syrupy coating.

Personal Connection

My fascination with zalabia began during a family trip to Egypt, where I first tasted these golden, syrup-soaked delights at a bustling street market in Cairo. The vendor, a skilled and friendly man, shared stories of how zalabia had been a part of his family's tradition for generations. Inspired by this experience, I decided to recreate zalabia in my kitchen, hoping to capture the essence of this beloved treat.

Recipe Evolution

Creating the perfect zalabia involves a few key steps. The batter must be mixed to the right consistency, neither too thick nor too thin, to ensure the dough puffs up nicely when fried. Yeast is used to leaven the batter, giving the zalabia their light and airy texture.

Once the dough has risen, it is carefully dropped into hot oil using a spoon or piping bag, forming small, round balls. The zalabia are fried until golden brown and then immediately soaked in a sugar syrup flavored with rose water, orange blossom water, or honey. This soaking process allows the sweet syrup to permeate the dough, creating a deliciously moist and sweet treat.

For an added touch, zalabia can be sprinkled with powdered sugar, cinnamon, or sesame seeds before serving. They are best enjoyed fresh and warm, though they can also be served at room temperature.

Sharing the Tradition

Today, zalabia is a favorite treat in my household, especially during holidays and family gatherings. They are the sweets I make when I want to share a piece of culinary history and tradition with friends and family. Each bite is a reminder of the rich cultural heritage and the joy of sharing food that has been cherished for generations.

Ingredients:

✅For the Batter:

2 cups all-purpose flour
1 teaspoon active dry yeast
1/2 teaspoon sugar
1 1/2 cups warm water

✅For the Sugar Syrup:

1 cup sugar
1/2 cup water
1/2 teaspoon lemon juice
1/2 teaspoon rose or orange blossom water (optional)

✅For Frying:

Vegetable oil for deep frying

Preparation Time: 20 minutes (plus resting time)
Cooking Time: 20 minutes
Yield: This recipe yields a delightful batch of Zalabia, perfect for sharing.

Instructions:

🍥The Batter:

  1. In a small bowl, mix warm water, sugar, and active dry yeast. Let it sit for 5-10 minutes until frothy.
  2. In a large mixing bowl, combine the frothy yeast mixture with all-purpose flour. Mix until you have a smooth batter. Cover the bowl and let it rest for 1-2 hours, allowing the batter to rise and become airy.

🍥The Sugar Syrup:

  1. In a saucepan, combine sugar, water, and lemon juice. Bring it to a boil, then reduce the heat and simmer for about 10 minutes until it thickens slightly.
  2. Remove from heat and add rose or orange blossom water (if using). Set the syrup aside to cool.


🍥Frying the Zalabia:

  1. In a deep frying pan, heat vegetable oil to 350°F (175°C).
  2. Using a spoon or your hand, drop small portions of the batter into the hot oil. Fry until they turn golden brown and crispy, about 2-3 minutes per side. You can shape them into small balls or irregular shapes, as is traditional.
  3. Remove the fried zalabia with a slotted spoon and drain on paper towels to remove excess oil.

🍥Serving:

  1. While still warm, dip the fried zalabia into the cooled sugar syrup. Ensure they are fully coated.
  2. Serve immediately, garnished with chopped nuts (like pistachios or almonds) if desired.

Pro Tips

  1. Fry to Perfection: Maintain the oil at the right temperature for crispy zalabia. Too hot, and they may burn; too cool, and they won't puff up.
  2. Customize Your Syrup: Adjust the thickness and flavor of the sugar syrup to your preference. Some enjoy it thicker, while others prefer a hint of rose or orange blossom water.

Secret Tips

  1. Generous Shapes: Embrace the irregular shapes of zalabia, for they hold the essence of tradition and the warmth of sharing.

As you savor Sam's Zalabia, you become part of a beautiful tradition that transcends time. It's a sweet reminder of the importance of generosity, kindness, and unity—values that shine brightly during Ramadan and beyond. Let the golden bites melt in your mouth, and may their sweetness fill your heart with warmth and joy.

Happy Baking!
Sam